How To Remove Background From Scanned Image With Photoshop
In this tutorial, you will learn how to quickly remove the background from scanned images or white areas around your scanned paper drawings using Photoshop. It works for watercolor paintings, sketches, ink drawings, and handwritten text.
Table Of Contents
- Step-By-Step Guide For Removing Background From a Scanned Image Using Photoshop:
- STEP 1: Open The File
- STEP 2: Adjust Brightness
- STEP 3: New Layer
- STEP 4: Adjust Contrast
- STEP 5: Adjust Curves
- STEP 6: Open The Settings Panel
- STEP 7: Adjust Highlights
- STEP 8: Flatten The Layer
- STEP 9: Make Layers Invisible
- STEP 10: Adjust The Solid Color By Layer
- STEP 11: Open Layer Style Panel
- STEP 12: Make The Background Disappear
- STEP 13: Create a New Layer & Merge Them
- STEP 14: Use Polygonal Lasso Tool
- STEP 15: Copy And Paste Layers
- STEP 16: Fill The Layer With Color
- STEP 17: Clean The Remaining Dots
- STEP 18: Make The Layer Invisible
- STEP 19: How To Remove Background From Scanned Image – Export The File
- Final Image After You Remove Background From Scanned Document
Step-By-Step Guide For Removing Background From a Scanned Image Using Photoshop:
STEP 1: Open The File
Open up Adobe Photoshop, then open your scanned image.
To do this, go to File -> Open and select your file, or simply drag and drop the image into Photoshop.
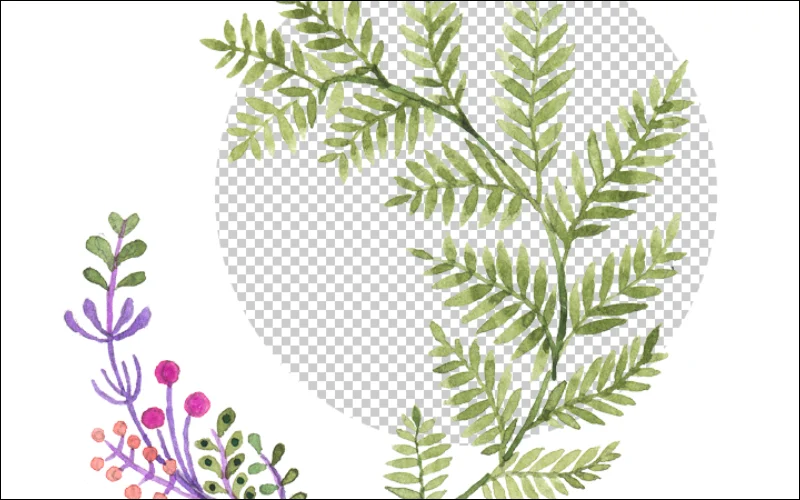
For this tutorial, we will use this scan of a beautiful watercolor painting created by our talented colleague.
STEP 2: Adjust Brightness
In the Layers panel (F7), click the eclipse icon and select the “Brightness/Contrast” adjustment layer.
Check out these Free Gold Backgrounds
STEP 3: New Layer
Now you should see a new layer named “Brightness/Contrast 1”. Double-click its layer thumbnail. A new window will now pop up with two sliders.
STEP 4: Adjust Contrast
Push the Brightness (2 to 4) and pump up the contrast to preserve most of the colors. The idea is to make the paper as white as we can so we can filter it out later.
STEP 5: Adjust Curves
Click the same eclipse icon and select “Curves.” At the moment, this does nothing because the default values do not modify the image.
STEP 6: Open The Settings Panel
Double-click its layer thumbnail to open its settings panel.
STEP 7: Adjust Highlights
Adjust the curve as below. The top right corner will pump up the highlights, while the curve’s “belly” will pump up the colors a bit more.
STEP 8: Flatten The Layer
With the “Curves 1” layer selected, press CTRL+ALT+Shift+E. This will flatten the image and paste the result on a new layer. Rename this layer to “flatten.”
Check out these Free Sparkly Backgrounds
STEP 9: Make Layers Invisible
Click the “eyes” near the adjustment layers’ thumbnails to make them invisible. We don’t need them anymore.
STEP 10: Adjust The Solid Color By Layer
Click the eclipse again and select “Solid Color.” This will create a new layer named “Color Fill 1.” Hit CTRL+Shift+[ to send it back.
For now, the layer its not visible because it is placed under the “flatten” layer.
When prompted to select a color, just pick a dark gray. It doesn’t matter much, this layer serves only as a visual guide.
STEP 11: Open Layer Style Panel
Select the “flatten” layer in the Layers panel and double-click near the layer thumbnail. This action will open the Layer Style panel.
STEP 12: Make The Background Disappear
Hold the ALT key and click-drag half of the white arrow to the left until you see the background disappearing. Click OK. If you get any white edges on your drawing, you can slide the left half of the arrow just a bit to the left.
STEP 13: Create a New Layer & Merge Them
Create a new layer (CTRL+Shift+N), hold Shift, and select the “flatten” layer as well, then go to Layer -> Merge Layers (CTRL+E).
Check out 20 Best Free Marble Backgrounds
STEP 14: Use Polygonal Lasso Tool
Grab the Polygonal Lasso Tool (L) and roughly select the drawing. Once you close in the shape, you will see a “marching ants” effect on its contour.
STEP 15: Copy And Paste Layers
Hit CTRL+C to copy it.
Now go to File -> New… and hit OK. It will create a new document with the size of the copied selection from our layer.
Then, paste it in (CTRL+V).
STEP 16: Fill The Layer With Color
Press D to reset the foreground and background colors. Select the “Background” layer and press ALT+Backspace. This action will fill the entire layer with the current foreground color.
To fill the layer with the background color, press CTRL+Backspace.
STEP 17: Clean The Remaining Dots
Select the “Layer 1” layer. Now, grab the Eraser Tool (E) and clean up any remaining white dots. The background is black, so you can now see them clearly.
STEP 18: Make The Layer Invisible
Click the “eye” near the “Background” layer to make it invisible.
Check out 3500+ High-Resolution Backgrounds
STEP 19: How To Remove Background From Scanned Image – Export The File
Go to File -> Export -> Save for Web (Legacy) (CTRL+ALT+Shift+S).
Learn to press them with one hand. This command is really useful, and you will use it a lot.
Final Image After You Remove Background From Scanned Document
The watercolor image is now ready to be used without the background. Hope this step-by-step guide on how to remove background from scanned image will help you to know how to get rid of the white background on the image.
We hope you’ve learned how to delete a white background in Photoshop today. If you did, please let us know in the comments section or share this article with someone who needs it.
Also, check out 7 Perfect Text Colors That Can Be Used On Golden Backgrounds
Like this post? Check out more inspirational and helpful articles on Graphic Design.
Very helpful! Great way to pull out the subject matter.
Great, thank you :)
thank you very much!
Could someone help me with key commands for Mac? Thanks in advance
Nevermind, got it! And thank you for the very helpful tutorial!
Very helpful, but one question. How ist it possible to remove the white background but not the white parts inside the picture, because I dont want have any transparent parts in the drawing.
Any ideas?
Great, thank you
I accidentally started drawing on a white layer so this was very helpful for me! thank you sm
Thank you for sharing the tutorial
Thanks for the essential blogpost. Can I have a video tutorial?
You’re a wizard Doink! Thank you so much, this was extremely useful.
Fabulous
.gonna give it ago..many thanks
Very Helpful Article
Thanks for your help
Thank you for this tutorial. Very informative post. Thanks for sharing.
Nice Blog and thanks for sharing such a useful information to us. I really love this blog.
Really appreciate these tips.
Much obliged! This was very helpful.
This content is still a worthy piece in 2021 for a designer like me. Steps have described in the easiest way. Thanks for the tip.
Cool….I stucked in doing these….thanks a lottt…
Very well-explained article. Thanks, Doink for sharing this tutorial with us. Looking forward to reading more articles from you.
Amazing post. It is a very informative article for me.
This is absolutely great!
No way i could have written it better than this! Thank you so much.
EMDigitizer has been providing premium quality embroidery digitizing service for embroidery digitized by experienced digitizers.
Wow, What an excellent post. I actually found this for many informatics. That’s what I’m looking for. Affirmation is the best article.
Thank you for this tutorial.
Falcon offers reliable invoice discounting platforms in India. It helps businesses get quick cash by selling their invoices. With Falcon, you can manage your working capital easily and grow your business without payment delays.
it’s very usefull, mark it
Nice post. Information will be helpful for me.
This is life saver for me as a person that is not techy.
This is awesome! Thanks for taking the time to share this informative content.
More tutorial like this please!
It’s good to see such a supportive community around this subject.
I like the positive and supportive atmosphere in this forum.
Tanks! Here are the best free MethStreams alternatives to live and free Sports streaming sites!
I’ve found that mastering quick background removal techniques is a total game-changer for streamlining my workflow when creating high-quality marketing thumbnails and digital assets. Thanks!