How to Create an Outstanding Wallpaper Design in Photoshop
Today we will create a textured abstract design in Photoshop using stock photos, brushes and a few guidelines regarding the composition. The tutorial not only points out the techniques used, but also the reason why it is used. It is important for us that you understand every step, so you can squeeze out every drop of knowledge out of this tutorial.
By completing this tutorial, you will learn how to:
– blend images into a single scenario
– use tones and color spots to create focus points
– adjust tones in a picture
– cut out objects from an image
– create a grungy background
– create your composition based on tones and texture
– make subtle retouching on your image
Difficulty: Beginner – Intermediate
Completion time: 30 min
Tools: Photoshop CS3
Resources:
– model by liam-stock
– watercolor brushes by PSD Tuts+
– sky by plaintextures.com
– C4D Renders by refueled
– mountain by ForsakeWolf
– pheasant feather by Starrystock
– grunge texture pack by Princess-Of-Shadows
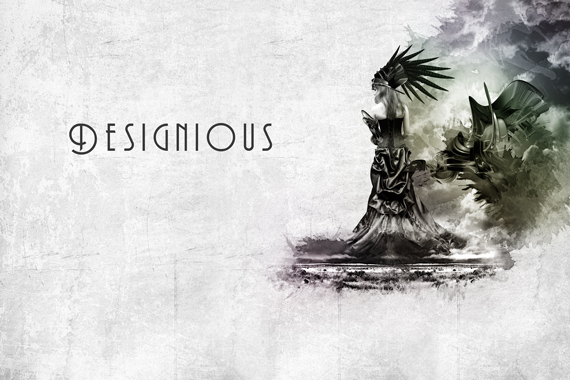
Final Image Preview of the Outstanding Wallpaper Design

STEP 1
We start with a 3000 x 2000 px in RGB color mode at 72 dpi document (CTRL+N). Open a paper texture, select it (CTRL+A), copy it (CTRL+C) and paste it into our document (CTRL+V). Place it like below.


STEP 2
Go to Image > Adjustments > Desaturate (CTRL+SHIFT+U) and Image Adjustments > Levels. Use the settings below. Duplicate this layer twice (CTRL+J two times) and place the copies like below. Rotate/Flip them.

STEP 3
Grab the Eraser Tool (E), grab a soft brush, set Opacity to 40% and erase part of the overlapping edges to make them blend in. Use CTRL+click on the images to select the respective layers.


STEP 4
Open the Vienne_6_by_liam_stock.jpg (File > Open…). In the Layers palette (F7), double-click the lock near the layer thumb. Hit OK and go to Layer > Duplicate Layer (CTRL+J).

STEP 5
Go to Filter > Other > High Pass. Give it a 2 px setting and hit OK. Set the layer’s Blending mode to “Overlay”.
This will sharpen the image and increase the tones quality in the picture.

STEP 6
Go to Layer > Merge visible (CTRL+SHIFT+E). Now grab the Path Tool (P), set it on Paths and trace the contour of the model. Feel free to zoom in for a more accurate tracing. Make sure you close the path.

STEP 7
Right-click > Make Selection. Set it to 0 px and hit OK. Copy it (CTRL+C), go back to our document (Window > Untitled-1) and paste it (CTRL+V). Use the Eraser Tool (E) to clean up any rough edges.

STEP 8
Go to Edit > Free Transform (CTRL+T) to enter free transform mode and click-drag one of the corners. Hold the SHIFT key to preserve proportions. To exit Free Transform mode, hit Enter. Go to Image

STEP 9
Grab the Spot Healing Brush (J) and click on the skin spots. This will clean them up, nice and easy. Go to Layer > Adjustments > Desaturate (Hit CTRL+SHIFT+U).
You can also use the Clone Stamp Tool (S), but it requires twice the time to do it.

STEP 10
Go to Layer > New Adjustment Layer > Brightness/Contrast. Use the settings below.

STEP 11
Open the Mountain_Stock_10_by_ForsakeWolf.jpg. Select the entire picture (CTRL+A), copy it (CTRL+C), go back to our document (Window > Untitled-1) and paste it. Hit CTRL+T to enter Free Transform mode and resize it like below. Hit Enter and desaturate it (CTRL+SHIFT+U).

STEP 12
Go to Layer > Layer Mask > Reveal All. Open the “Watercolor Brushes”. To load them in the Brushes palette, extract the .abr file in your computer and double-click the file.

STEP 13
With the layer mask still selected, grab the Brush Tool (B), select a brush from the ones loaded in STEP 10 and rotate it until you obtain a horizontal splash. The brush preview is useful, use it as a guide.

STEP 14
Set the brush Opacity to 30% (press “3”), reduce its size to about 1400 px and paint the edges of the image, like below. Then change the brush, set Opacity to 100% (press “0”) and paint the rest of the edges and duplicate (CTRL+J) and reflect (CTRL+T > right-click > Flip Horizontal) the resulting image.
Repeat until you obtain a shape like below. Go to Image > Adjustments > Brightness/Contrast and increase the contrast a bit.


STEP 15
Grab the Move Tool (V), CTRL+click the model on the canvas to select its layer and go to Layer > Layer Mask > Reveal All again. Repeat STEP 12 for the bottom part of the dress.

STEP 16
Open the “1.psd” file from the “Cinema 4D Render Pack”. Turn off the visibility of the bottom-most layer and select the “Layer 0” layer. Grab the Rectangular Marquee Tool (M), select the render and copy it (CTRL+C).

STEP 17
Go back to our document and paste it (CTRL+V). Go to Image > Adjustments > Desaturate (CTRL+SHIFT+U), then go to Layer > Duplicate Layer (CTRL+J). Turn off the visibility of the original layer.

STEP 18
Go to Edit > Free Transform (CTRL+T) and resize it like below. Hit Enter. Go to Layer > Layer Mask > Reveal All.
We will use a part of the render to add as apparel to the model. In this case, I want to add a headdress.

STEP 19
Grab the Brush Tool (B), select a round, hard brush (Hardness is 100%) and paint over the area shown below. This will hide the area, leaving only the wanted shape.


STEP 20
Open the “pheasant_feather_by_Starrystock.jpg” picture. Repeat STEPS 2-4 to sharpen it, then go to the Channels window (Window > Channels). Select the “Blue” channel, then right-click its thumb and select “Duplicate channel”.

STEP 21
Select the “Blue copy” channel and go to Image > Adjustments > Curves, then Image > Adjustments > Levels. Use the settings below or similar.


STEP 22
Grab the Brush Tool (B) and paint with black the inside area of the feather.

STEP 23
Go to Image > Adjustments > Curves. Use the settings below (click on the curve to create anchor points, then click-drag them). Crop (C) the image si it does not have any extra shapes.


STEP 24
Now that we have maximum contrast between the feather silhouette and background, we can cut out the feather.
CTRL+click the “Blue copy” channel thumb to load the selection, go to the Layers palette (F7), click the thumb, go to Select > Inverse (CTRL+SHIFT+I) and copy it (CTRL+C).


STEP 25
Go back to our document (Window > Untitled-1) and paste it. Duplicate it (CTRL+J), turn off the visibility of the original layer and desaturate it (CTRL+SHIFT+U).

STEP 26
Go to Image > Adjustments > Brightness/Contrast. Use the settings below, then hit CTRL+T to enter Free Transform mode, resize it and place it like below. Hit Enter.

STEP 27
Duplicate this layer (CTRL+J), hit CTRL+T, resize it and place it like below. Do the same for the other feathers.


STEP 28
Select all these layers (SHIFT+click the layer thumbs) and go to Layer > Merge Layers (CTRL+E).
Then go to Image > Adjustments > Brightness/Contrast and tweak it again to fit.
Although we used this on the feather, that doesn’t mean it has to be perfect from the start. Trial and error is the way to go, and it’s way more fun.

STEP 29
Turn on the visibility of the 3D render and duplicate it again (CTRL+J). Enter Free Transform mode (CTRL+T) and place it like below. From this point, repeat STEP 16 to mask the unwanted areas.
I added this “sleeve” because i want the model to stand out from the background and contrast is a good way to do this. I removed the part covering the shoulder because I don’t want it to look like a body armor.


STEP 30
Open the “sky” picture. Select the entire image (CTRL+A), copy it (CTRL+C), go back to our document (Window > Untitled-1.psd) and paste it (CTRL+V). Resize it, place it like below. Hit Enter.

STEP 31
Desaturate it (CTRL+SHIFT+U), duplicate the layer, flip it and place it like below. Go to Layer > Layer Mask > Reveal All. Use the technique from STEP 12 to create a border like below. Feel free to adjust the Opacity of the brush for more interesting effects.

STEP 32
There’s a nasty bright spot near the model, so let’s fix that. Duplicate a 3D render (CTRL+J) and place it like below, then go to Layer > Layer Mask > Reveal All.

STEP 33
Create a new layer (Layer > New > Layer or CTRL+SHIFT+N). Grab the Brush Tool (B), select a watercolor brush, rotate it until you can draw a “back-slash” splash, hit D and draw a few splashes. Vary the brush opacity a bit to blend it in nicely (the “1” to “0” keys change the brush opacity from 10 to 100%).

STEP 34
Create a new layer (CTRL+SHIFT+N), grab the Brush Tool (B), grab a soft round brush and paint some large strokes, like below. Use bright colors.

STEP 35
Set the layer Blending mode to Soft Light and Opacity to 37%.

STEP 36
Grab the Horizontal Type Tool (T) and click-drag to create a text box. Type a text of your choice, hit CTRL+A and set the font to “Andes” and size to about 190.

STEP 37
Select the top-most layer, select all artwork (CTRL+A), copy merged (CTRL+SHIFT+C) and paste it (CTRL+V). Go to Filter > Sharpen > Sharpen).
Done!
[download id=”176″]
Hi! I just love your tutorial! Congratulations!
I`we just opened a tutorials indexing website and I would like to ask you to submit your tutorials, it will bring you some extra traffic
Please give a chance for my website: http://www.tutorialswindow.com
Thanks!
Wow that’s amazing, ty for sharing
One of the best tutorials … simple final cut but yet amazing monochrome effect..
Wonderful tutorial, I have something to share here, In the final image the subject(the model) is not visible even after watching it 3 to 4 times i have not identified that model.you would have mode the model little bigger in size, this is my personal view, Tutorial is wonderful and keep posting..
Good tutorials thanks for sharing
Joe
http://www.ezdrivingtest.com (Free Online Portal to prepare for USA Driving written test)
Excellent, thanks!
Great tutorial. Thanks.
Great Tutorial. I love the outcome. Simple but just stunning.
cooool
do u have a youtube video doing this exact tutorial? I find it hard to follow this way..just saying.
Not yet, but now that you mentioned, it we will schedule a video tutorial :) stay tuned
1zqjue'”(){}:/1zqjue;9
1zqjnn'”(){}:/1zqjnn;9