How to create a Ying Yang Inspired Poster in Photoshop
Today we will create a poster inspired by the all-known symbol, Ying and Yang. We will try to create the same balance from the sign in a more elaborate illustration.
Difficulty: Intermediate
Completion time: 1-2 hours
Tools: Adobe Photoshop CS3
Resources:
– Girl from Katanaz-Stock
– Birds from Fairiegodmother
– Designious splashes brush pack 1
– Designious paint brush pack 1
– Smoke brushes from Falln-Brushes
What you’ll be creating

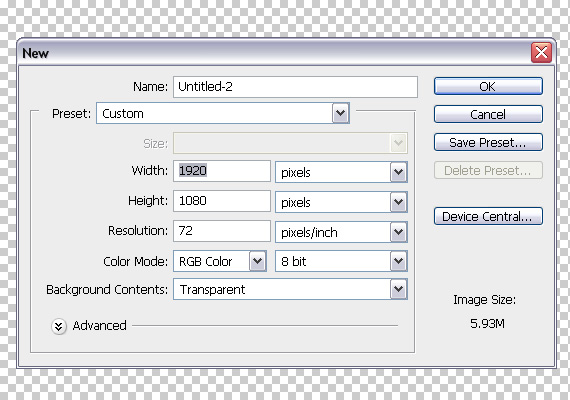
STEP 1
Create a new document of 1920×1080 px in RGB color mode at 72 dpi. I usually make it larger, because I can crop it later on.

STEP 2
Open the “girl†picture. Go to Layer > Duplicate Layer (CTRL+J), then go to Filter > Other > High Pass. Set Radius to 1.1 px and hit OK.

STEP 3
Go to Window > Layers (F7) and set Blending mode to Overlay. Select all layers and to to Layer > Merge Layers (CTRL+SHIFT+E).

STEP 4
Go to Channels window (Window > Channels) and click-drag the Blue channel onto the “Create New Channel†button. A “Blue copy†channel will appear. Click it.

STEP 5
Go to Image > Adjustments > Curves (CTRL+M). Set the graph similar to mine.

STEP 6
Repeat STEP 5 using an aproximate setting. The idea is to create a high contrast so we can load a precise selection from the “Blue copy†channel.

STEP 7
Grab the Brush Tool (B), press D to set Foreground to pure black and paint over the girl’s body.

STEP 8
Grab the Burn Tool (O), set it to Shadows and press “0†to set it to 100%. Darken all the lighter areas on the girl.

STEP 9
Go to Image > Adjustments > Curves (CTRL+M) and adjust the curve similar to mine. We do this to remove the light gray areas from the channel.

STEP 10
In the Channels window, CTRL+click the “Blue copy†channel thumbnail to load a selection. You will see a “marching ants†contour. Click the “RGB†channel and turn off visibility of “Blue copy†channel.

STEP 11
Double-click the layer thumbnail in the Layers palette (F7) and hit OK to make it editable. Hit Delete.

STEP 12
Go to Window > Arrange > Cascade. Now click-drag the layer thumbnail into our document. Go to Edit > Free Transform (CTRL+T) to enter Transform mode and click drag one of the corners while holding SHIFT key to preserve proportions. Hit Enter.

STEP 13
With this layer selected, go to Layer > Layer Mask > Reveal All. Now grab the Brush Tool (B), press D to set Foreground to pure black and paint over the girl’s feet.

STEP 14
Go to Layer > Duplicate Layer (CTRL+J). Do this twice.

STEP 15
In the Layers palette (F7), select the original layer. Now grab the Smudge Tool (R), set a round, soft brush and adjust Strength to about 60%. Start doing strokes on the edges of the woman. Try to maintain the same direction.

STEP 16
Repeat STEP 15 for the second layer, but do a bit shorter strokes. Also reduce Strength a bit.

STEP 17
Go to the Layers palette (F7) and click the “New Layer Group†button.  Name it “girl†and click-drag all the layers with the girl in the layer group.

STEP 18
In the Layers palette, create a new layer above all the layers in the “girl†layer group. Open the “Designious paint splash 1†brush set. Use settings similar to mine.

STEP 19
Paint over the edges like I did. Simply hold ALT key to pick random nearby colors from the girl’s body. Also increase and decrease the size of the brushes using “[“ and “]†keys. There’s no need to draw strokes, just click around or tap your graphic pen.

STEP 20
Create two new layers above the splatters layer. Select the first one and grab the Brush Tool (B), set Hardness to 100% and paint three or four colors: bright yellow, orange, red and bright red.

STEP 21
Decrease the size of the brush to 5-6 px, select the next layer above in the Layers palette (F7) and start painting random, curvy shapes. Use the dark red color – pick it with ALT+click.

STEP 22
Select the orange color and roughly try to follow the lines drawn with the bright red color.

STEP 23
Do the same for the rest of the colors. This is how the final result should look like.

STEP 24
Open the Brushes palette (F5) and change it to a splatter. Make a very small sized bush and as in previous steps, add random color spots of different colors.

STEP 25
Create a new layer above the top-most layer with the girl and set Blending mode to Soft Light. Then grab the Brush Tool (B) and pick the orange color (ALT+click), set Hardness to 0% and press “5†to set the brush’s Opacity to 50% and paint some bright lights on the girl’s body.
ALT+click between these layers when you are done.

STEP 26
Create a new layer above the bottom-most layer. Name it “paintâ€. Open the “designious paint scratch pack 1â€, select a brush and use the settings below.

STEP 27
Grab the brush tool and paint two brush strokes, one light gray and one midtone gray.

STEP 28
Go to Layer > New layer. Name it “smokeâ€. Use the same settings as with the paint brushes, hit D key and paint 2 smoke strokes.

STEP 29
Grab the Ellipse Tool (U), click on the canvas and hold SHIFT key to draw a perfect circle. Give it a white color fill. Make sure it is set on Shapes. Set Blending mode to Soft Light in the Layers palette (F7).

STEP 30
Repeat STEP 29, but use a dark gray color and set blending mode to Multiply.

STEP 31
Create a new layer (CTRL+SHIFT+N). Now create white shapes of your choice: draw them, create random triangles, circles, squares… go wild! Set Opacity to 40%.

STEP 32
Open the “birds†.psd file, grab the Lasso Tool (L), select a bird of your choice, copy it (CTRL+C) and paste it in our document (CTRL+V). Also go to Edit > Free Transform to make it smaller. Hit Enter. Go to Image > Adjustments > Desaturate (CTRL+SHIFT+U).

STEP 33
Repeat STEP 32, but this time go to Image > Adjustments > Invert (CTRL+I). Grab the Dodge Tool (O), set it on Shadows with 25% Exposure and lighten the dark areas.

STEP 34
Select the second copy of the “girl†layer. Now grab the Pen Tool (P) and draw a shape similar to mine and use white as fill color. Set Blending mode to color.

STEP 35
Select the bottom-most layer and go to Layer > New > Layer. Open the “concrete textureâ€, select all (CTRL+A), copy it (CTRL+C) and paste it in our canvas. Resize it to fit and set Blending mode to “Hard Lightâ€.

STEP 36
Create a new layer (CTRL+SHIFT+N), grab the Brush Tool (B), select a dripping splash and click under the bottom side of the girl’s body.

Done!
nice out come ! thanks for tuts :)
that’s awsome !! thanks
nice tutorial, the result is wonderfull.. thanks
Wow.. Great outcome you did :)
Nice tuts!! But,
When did u change the background to grey? (after step 16)
& The Background looks grungy!
Where is the concrete texture?
It could have been better if you could have the shown the full images where the changes take place!!
Anyways, helpful tutorial!!
Thanks for sharing this wonderful post
This tutorial really great, thanks for posting it
i don’t know how open new document…where…???….please help meeee…..because this final photo is very amaizing….pleaseeee…helpppp
Go to File > New…
It’s look like easy to make Ying Yang poster in Photoshop, but it isn’t that easy to do. Regular practice can make it easy to anyone.
thanks for sharing this beautifully designed tutorial… this will be the tutorial of the week next week – first week of august 2010 – on http://www.rnel.net – keep posting nice designs and submit more.. thanks again
That’s great. Thank you very very much
wow.. Fantastic steps.. i really like it. keep up :-)
This is very good tutorial.
Please give us new one.
Excellent tutorial….very inspiring and true skill using Photoshop.
interesante gracias por el aporte
This user has deactivated their account. ‘ about the girl stock ‘ :'(
Try using a similar stock photo, the effects applied are basically the same. If you need any assistance with the new photo, please ask in the comments.
this good, humane farming association
This is a good site. Hydroxycut
Thanks for the Great Post. Knowledge Plus is a Registered Training Organisation meeting strict nationally recognised quality control for Training and Assessment. Knowledge Plus has won numerous awards in recognition of their outstanding Customer Service. We specialise in Workplace-Based Training, Management Development, Change Management, Project Management, OHS and IT Training and have provided superior training to over 1600 professionals.
that’s awsome !! thanks
Although the art work is creative and very hard to do but with fantasy.
A good presentation makes a hard thing easier to the viewers as this is. Really appreciate it.
This is what I was looking for from last week. Great work done. :)
I am really glad to see this your post. Amazing tips.
Thanks
Excellent work has been shown. In 36 steps, the work has been shown so beautifully that it is much better than any other medium. Thanks so much for the creative work.