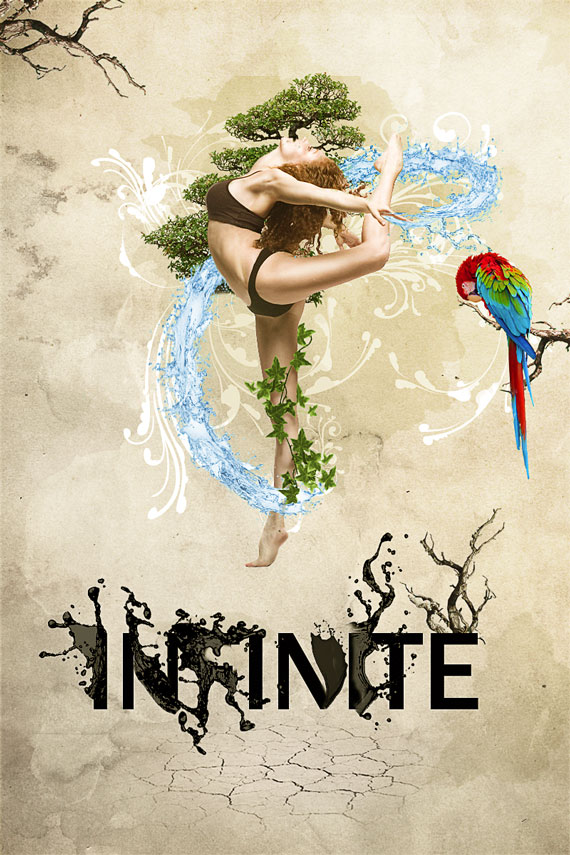
How to create a dynamic nature poster in Photoshop
In this tutorial we will create a nature poster using stock images, vectors and brushes.
Tools: Adobe Photoshop CS3
Difficulty: Intermediate – Advanced
Completion time: 1-2 hours
Resources:
– floral vector pack 31 from designious.com
– girl from npoz1
– parrot from RainaDayze
– branches from PKVstock
– bonsai from Resurgere
– splashes from fotolia.com
What you’ll be creating
STEP 1
Create a new document of 800×1200 px at 72 dpi in RGB color mode. Grab the Paint Bucket Tool (G) and fill the layer with pure white (#ffffff).

STEP 2
Open the “paper texture” image. Select all (CTRL+A), copy it (CTRL+C) and paste it in our drawing.

STEP 3
Go to Edit > Free Transform (CTRL+T), hold the ALT+SHIFT keys and click-drag one of the corners to resize it. Make it fit our canvas.
Then hit Enter.

STEP 4
Open the Layers palette (F7) and set Opacity to 45%. Grab the Dodge Tool (O), set it to Shadows at 17% Exposure and lighten the dark areas.

STEP 5
Go to Layer > Duplicate Layer (CTRL+J). Go to Image > Adjustments > Desaturate (CTRL+SHIFT+U). Set Blending mode to Hard Light and Opacity to 18%.
This will amplify the small midtones.

STEP 6
Duplicate the layer again (CTRL+J) and set layer Blending mode to Overlay at 100% Opacity. This will enhance the small highlights on the paper texture.

STEP 7
Select the top-most layer in the Layers palette and click the “New Layer Group” button. Name it “background”. Select all layers (shift-click selection) and drag them in the layer group.

STEP 8
Open the “dancer” image. Double-click the lock in the Layers palette (F7) and hit OK to make it editable.

STEP 9
Go to Layer > Duplicate Layer (CTRL+J), then go to Image > Invert (CTRL+I).

Note:
Since we are doing a selection via Channels, I will explain how the trick works.
Try to envision the tints rather than the colors in a picture, like you would see only red, blue or green.
In our case, blue is dominant and stands out the most from the background.
Knowing this, we will be able create even higher contrasts between the element and the background using the Blue channel. The higher the contrast, the more precise our selection will be.
STEP 10
Go to the Channels window (Window > Channels) and click-drag the “Blue” channel on the “New Channel” button. This will create a copy of the blue channel to work on, so we don’t damage the original
picture.

STEP 11
Go to Image > Adjustments > Curves (CTRL+M) and adjust the graph like below.

STEP 12
Repeat STEP 11 until the midtones disappear almost completely.

STEP 13
Use the Path Tool (P) and trace the midtone areas. Try to be more accurate in the contour areas.
Once you made a closed shape, right-click > Make Selection… and paint inside the selection with white using the Brush Tool (B).
Once done, go to Select > Deselect (CTRL+D).

STEP 14
In the Layers palette, CTRL+click the “Blue copy” channel thumbnail. This will make a selection of the body.
Turn on the “RGB” channel’s visibility and off the “Blue copy” ‘s.
Open the Layers palette (F7), turn of visibility of the “Layer 0 copy” layer and select the “Layer 0” and click the “Add Layer Mask” button.

STEP 15
Select “Layer 0” layer and go to Layer > Duplicate Layer… (CTRL+J). Select both layers and go to Layer > Merge Layers (CTRL+E).

STEP 16
There’s a nasty white contour left from the selection.
CTRL+click the layer thumbnail, then go to Select > Modify > Contract and set it to 1 px. Go to Select > Inverse and hit “Delete”.

STEP 17
Go to Layer > Layer Mask > Reveal all. Grab the Brush Tool (B) and paint with black over the shadow under the right foot.

STEP 18
Go to Window > Arrange > Cascade and click-drag this layer into our document.

STEP 19
In the Layers palette (F7), click the “New layer Group” button and click-drag this layer into the group. Name this group “girl”.

STEP 20
Create a new layer above the “Layer 0 copy 2” layer. Now grab the Pen Tool (P), set it on Paths and draw a shape like i did. Feel free to make another one if you like.
Then right-click > Stroke Path… Hit OK.
This will be only a guideline, so don’t bother polishing it.

STEP 21
Open the “splashes”, double-click the lock in the Layers palette and hit OK. grab the Magic Wand (W) and select the background. Hit Delete.
Select all (CTRL+A), copy it (CTRL+C) and paste it in our document (CTRL+V).

STEP 22
Go to Edit > Free Transform and resize it. Hold SHIFT key to preserve proportions. Hit Enter.

Go to Edit > Transform > Warp and make it look something similar to below. Hit OK.

STEP 23
Repeat STEP 22 until you cover the entire black guide. Feel free to add layer masks to cover the loose areas, like in STEP 17.

STEP 24
Select all the splashes layers in the Layers palette and go to Layer > Merge Layers (CTRL+E). Rename the resulting layer to “water”. Also place it in a new layer group.

STEP 25
Select small splashes areas from the “splashes” picture and paste them in our drawing. Resize them, but do NOT warp them like the first ones. Try selecting areas with shapes similar to our splash.

STEP 26
Repeat STEP 25 until you cover up the entire splash. Then select all splash layers and go to Layer > Merge Layers. Also Add a Clipping Mask like in STEP 17 to make the water pass behind the girl.

STEP 27
Select the top-most layer in the “water” layer group and go to Layer > New Adjustment Layer > Hue/Saturation. Make sure you check the “Use previous layer to create Clipping mask”.
Use the settings below.

STEP 28
Create a new layer above the “Background” layer group (Layer > New Layer or CTRL+SHIFT+N). Open the “paint brushes” and select one of your choice.
Use the settings below or similar.

STEP 29
On the newly created layer, throw a few brush strokes, behind the girl. Set layer Blending mode to Multiply and Opacity to 54%.

STEP 30
Repeat STEP 29, but set Opacity to 59%. Place these in a layer group and name it “splashes”.

STEP 31
Create a new layer group below the “splashes” layer group. Name it “flowers”. Now open the “vector flowers”, use the Lasso Tool (L) to select a flower of your choice, copy it and paste it in our drawing.
Also place it in the “flowers” layer group.

STEP 32
Place flowers around and try to follow or continue the body lines or the water. Feel free to mask any harsh intersections that will create strong spots.

STEP 33
For each flower, click the “fx” button in the Layers palette and set Color Overlay to white (#ffffff).

STEP 34
Open the “bonsai” picture and extract it like we did with the woman.
Hint: Since the dominant color is green, try exploiting the “Green” Channel.

STEP 35
Place the “bonsai” layer behind the “Layer 0 copy 2” layer – the one with the girl.

STEP 36
Create a new layer above the “girl” layer and ALT+click between the layers. Set the layer’s Blending mode to Overlay, with 70% Opacity.

STEP 37
Grab the Brush Tool (B), select a round, soft brush, lower Opacity a bit, pick a light color from the girl’s body (ALT+click) and paint over the girl’s body lights.


STEP 38
Create a new layer group and name it “text”. Then grab the Type Tool (T), make a large type box and type a text of your choice.
I wrote “INFINITE” with Franklin Gothic font.

STEP 39
From the “splashes” pictures, pick a detailed area of splashes, copy it and paste it in our drawing. Make it fit like below.

STEP 40
Go to Image > Adjustments > Hue/Saturation (CTRL+U) and set Saturation to minimum and lower Lightness.

STEP 41
Go to Image > Adjustments > Curves. Create a curve similar to mine. The “S” shaped curve creates a higher contrast between shadows and highlights.

STEP 42
Select the layer with the text from the Layers palette (F7). Then go to Layer > Layer mask > Reveal all.

STEP 43
Press D key to return to the default color setting, select the layer mask, grab the Brush Tool (B) and paint over the extra areas of the text.

STEP 44
Repeat STEPS 42-43 for the other letters. Don’t modify too many, else the text will be unreadable. Place all the splashes in the layer group.

STEP 45
Open the “desert earth” picture, select a piece, rotate it and copy it (CTRL+C).
In our document, create a new layer above the “background” layer group. Go to Filter > Vanishing Point (CTRL+ALT+V).
Create the plane like below.

STEP 46
Paste the texture in the new window and click-drag it onto the plane. Hit OK.

STEP 47
Go to Image > Adjustments > Desaturate (CTRL+SHIFT+U). Then create a new layer above it and ALT+click between the layers.
Grab the Paint Bucket Tool (G) and fill this layer with a light brown color. Set Blending mode to “Color”.

STEP 48
Select the layer below and go to Layer > Layer Mask > Reveal all. Grab the Brush Tool (B) and paint over the edges with a round soft brush.

STEP 49
Create a layer group above all layers and name it “nature”. Then open the “parrot” picture, copy it and paste it in our document. Also resize it like below.

STEP 50
Go to Image > Adjustments > Hue/Saturation and play around with the “Hue” cursor till you get more vibrant colors on the parrot.

STEP 51
Open the “branches” image and extract the branches from the background like in STEPS 10-14. Copy it, paste it in our document and place it like below.
Go to Layer > Duplicate Layer (CTRL+J) to create more copies.


STEP 52
Open the “vines” picture. Extract it using STEPS 10-14. Then copy it, paste it in our document and resize it.
Create copies (CTRL+J) and place them like below. Place all layers in a group and name it “vines”.

STEP 53
Go to Image > Adjustments > Hue/Saturation and adjust it to have the same tint as the tree behind the girl.

STEP 54
Create a new layer and place it below the “vines” layer group. From the Layers palette, set Blending mode to Multiply.
Grab the Brush Tool (B), pick a dark color from the skin (ALT+click) and paint the shadows of the vines on the leg.

STEP 55
Go to Blur > Gaussian Blur and set it to about 3 px Radius. Hit OK.
From the Layers palette, reduce Opacity to 70% or until you are happy with the result. Then CTRL+click the “girl” layer thumbnail and click the “Add Layer Mask” button.
This will mask the unwanted areas of the shadows from the sloppy painting, if you’re using a mouse.

STEP 56
Select the top-most layer and go to Layer > New Adjustment Layer > Color balance. Use the settings below of feel free to use your own.


STEP 57
Go to Layer > New Adjustment Layer > Gradient Map. Set Blending mode to Saturation and Opacity to 20%.


STEP 58
Go to Layer > New Adjustment Layer > Gradient Map.


STEP 59
Select all layers and drag them on the “New Layer” button. Then go to Layer > Merge Layers (CTRL+D).
Go to Filter > Other > High Pass. Set it to 1.5 px. Hit OK. Set blending mode to Overlay and Opacity to 75%.

Done!
Excellent Tutorial. Thanks.
Great tutorial. Same tutorial from PSDTuts’ premium section with a twist, but still good stuff.
I can see what you mean, but the techniques used are completely different
Whoa, really nice work and great tutorial. Its amazing how designers can conceptualize these posters.
Very nice work
its very clear tutorial, thanks
waw thats good i love it–♥ ♥:) ♥ :) ♥ :) ♥ ♥ :) ♥ :) ♥ :) ♥ :) ♥ ♥♥ ♥:) ♥ :) ♥ :) ♥ ♥ :) ♥ :) ♥ :) ♥ :) ♥ ♥♥ ♥:) ♥ :) ♥ :) ♥ ♥ :) ♥ :) ♥ :) ♥ :) ♥ ♥♥ ♥:) ♥ :) ♥ :) ♥ ♥ :) ♥ :) ♥ :) ♥ :) ♥ ♥
aa haan..superb one indeed..thanks for sharing …
what is the photoshop version used? i can’t find edit->transform->wrap menu
Thanks for the following benefits:
1- Technique applied on splash over text for them to blend together.
2- The way creating selection from channels for subtracting difficult pic’s with hair and trees from backgrounds .. is wooow.
3-Creating guideline for any effect to be done later like pen tool line for water splash. My friend … many THANXX to you
With havin so much written content do you ever run into any problems of plagorism or copyright infringement? My site has a lot of completely unique content I’ve either authored myself or outsourced but it seems a lot of it is popping it up all over the web without my permission. Do you know any ways to help stop content from being stolen? I’d really appreciate it.
Thank You… Iam a fresher and i took 2 days to complete this….your descriptions are very detailed…thank you once again
nice
nice
awesome
AWESOME
MD NASIR
This guide would be good, IF IT TOLD YOU THAT YOU HAD TO PAY FOR SOME OF THE FUCKING PICTURES. Jesus I swear almost every guide I’ve tried on here leads me like half way only to tell me to download a picture that i have to fucking pay for, so I waste like 30 minutes of my time.
Or use the equivalent: a free picture. Try this: create your own textures and then give them away, for free. After spending 500$ on a camera and roughly another 200$ on other gadgets, such as diffuse lighting umbrellas.
Perfect
Glad you like it! :)
Such a beauty-full post, I love this post thanks for sharing this wonderful post.