Create a coffe cup in Photoshop
I woke up today earlier than usual and found some time to grab a cup of coffee. Then I had the idea of making one in Photoshop and i got something like this image below.

The resource files I used are these below:
Seamless vector from Designious.com.
Splatter vector from Designious.com
Brush Script Std font.
So let’s begin, shall we ?
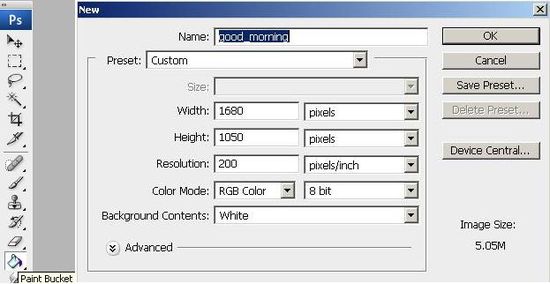
STEP 1
Create a new document using the settings below or feel free to use your own. I use these because i can use the image as a wallpaper and 1680×1050 is my screen resolution, for widescreen.(1) Fill it with a gray color using the Paint Bucket Tool (G). We do this to reduce the eye-strain of the white background so it doesn’t really matter which one you use.
STEP 2
Open the Vector seamless pack and pick one of the images. Copy it, paste it as Smart Object in our drawing. Resize it to look like below using Move Tool (V) with “Show transform controls” checked. This will be the model on the table.

STEP 3
Select the “Vector Smart Object” layer from layers palette (F7). Duplicate layer “CTRL+J”. Now select the new layer and grab the Move Tool (V) and reposition the pattern with the lower edge on the top edge of the image below it. Notice that there is a pattern so you can use the design of the seamless as guide to your repositioning. It should look like below.

STEP 4
Repeat STEP 3 until you cover up the entire drawing. To keep things organised, let’s create a layer group to put in all these layers. Go to layers palette (F7) and
click the icon that looks like a folder. You should see a folder in your layers palette named Group 1. Double-click its tag and rename it “table”.
select the top-most “Vector Smart Copy” layer, hold SHIFT key and click the first “Vector Smart Object” you created. Now drag them into “Table” layer group.

NOTE: Notice the gray flipped triangle ? That’s the button the expand or contract our layer group. Let’s click that.
STEP 5
Drag the “Table” layer group onto the “New Layer” icon. This will create a copy of our group. Now select the “Table copy” group and go to Layer > Merge Layers (CTRL+E). Click the “eye” near the “Table” layer group to turn off its visibility. This is a good way to edit images in a non-destructive way. Also it helpls for later editing.

STEP 6
Go to Layer > New Adjustment Layer > Hue/Saturation and use the settings below or use your own settings to give it a brownish tint.

STEP 7
Create a new layer above the “Table copy” one and set it to Multiply blending mode with a 40% Opacity. Name it “Table Shade”. Grab the Brush Tool (B) and set it to 300-400 px size and 0% Hardness. Now Start hand-painting the shadows like in the image below.

STEP 8
Now we will start creating the plate for the coffee cup. Create a new layer (CTRL+SHIFT+N). Grab the Elliptical Marquee Tool (M) make a circle selection in the center of our image (hold ALT+SHIFT key while dragging). Now select Gradient Tool (G) and set it like below or use different tones of gray. Now drag an aproximate 45 degrees diagonal over our selection to fill it. Make it look like below.


STEP 9
Double-click the “Shape 1” layer to open the Layer Style window and check the “Bevel and Emboss” tabs. Click that tab and set it like below or use your own settings. This is done so we have a soft thin border of our plate.

STEP 10
Go to Layer > Duplicate Layer… (CTRL + J) to duplicate the “Shape 1” layer. Grab Move Tool (V), hold ALT and SHIFT keys and make it a bit smaller. Now CTRL+CLICK the layer icon in the layer palette (F7) to make a selection. Use the Gradient Tool (G) like in STEP 8, only this time with the reverse tones of gray and at a different angle. Make it look like below.

Starting to look like a plate, huh ?
STEP 11
Duplicate this layer (CTRL+J) and resize it like in STEP 10. This will be the bottom part of our plate. Grab the Gradient Tool (G) and use the below setting of gradient.
CTRL+CLICK the “Shape 1 copy 2” icon in the layer palette (F7) to make a selection. Fill this with the gradient set.

STEP 12
Create a new layer group like we did in STEPÂ 4: Click the “Create a new group” icon, double-click its tag and name it “Plate”. Now select the “Shape 1” layers and place them in this folder. Then copy this group and merge it, like we did in STEP 5: Drag the layer group above the “New Layer” icon, hit CTRL+E to merge them. Turn off the group’s visibility.
Go to Filter > Noise > Add noise and give it a 1% Uniform noise. Make sure Monochromatic is checked.
We do this to “kill” the straight lines of the gradients and give it a more satin-like smooth look.

STEP 13
Double-click the “Plate copy” layer icon in the layers palette to pop up the Layer Styles menu and check “Drop shadow” with the following settings.

STEP 14
Let’s put a coffee cup on our plate !
Duplicate one of the “Plate” layer in the group and place it above all layers. Rename this layer to “cup body”. Grab the Gradient Tool (G) and set a gradient like below.

STEP 15
Double-click the “cup body”‘s layer icon in the layer palette to bring up the Layer Style menu. check “Drop shadow” and “Bevel and emboss” options, with the following settings.


STEP 16
Duplicate the “cup body” layer (select Layer in the Layer palette, hit CTRL+J). Right-click on the “fx” in the layer palette and select “Clear Layer Style”.
Grab the Elliptical Marquee Tool (M) and make a selection like below, then hit Delete key. Then deselect (CTRL+D). Open up the Layer Styles menu and use the settings below.


STEP 17
Coffee cups have handles, right? Right! Let’s create one.
Create a new layer below “cup body” layer (CTRL+SHIFT+N). Rename it “handle”. Grab the Rounded Rectangle Tool (U) and draw a shape like below.
Now CTRL+CLICK the “Shape 1” layer icon to make a selection and click the “handle” layer.
Use a gradient like below to fill it, just like we did with the plate. Delete the “Shape 1” we just created, it’s the shape we were after (drag layer above “trash can” icon).

STEP 18
Create a new layer group and name it “cup”. Place the layers above the “plate” layer group into the newly created group.
The coffee cup should look like this image below. Since it’s empty, let’s pour in some coffee.

STEP 19
Grab the Elliptical Marquee Tool (M) and make a selection of the interior of the cup, just like below. Create a new layer (CTRL+SHIFT+N) and name it “coffee”.

STEP 20
Go the colors palette in the left side of your screen and select two brown colors: one darker and one lighter. I used #4b1b00 and #834300. Now go to Filter > Render > Clouds.
Press CTRL+F until you get some nice contrasts. Grab the Burn Tool (O) and set it to Midtones with a 52% Exposure and click-drag on the edges of the selection. It should look like below.

STEP 21
Now we are going to create a teaspoon. Create a new layer above all layers (select top-most layer, press CTRL+SHIFT+N). Name this to “teaspoon cup”. Grab the Elliptical Marquee Tool (M) and make an oval selection like the cup of the teaspoon.

STEP 22
Grab the Gradient Tool (G) and fill our selection with a gradient like below.

STEP 23
Grab the Rectangular Marquee Tool (M) and make a selection smaller than the previous one.
We do this to give the spoon some volume. Fill it with Gradient Tool (G) set on Radial, like in STEP 22, only with these settings below. Should look like this.

STEP 24
Create a new layer below the “teaspoon cup” layer. Now grab the Rectangular Marquee Tool (M) with 10 px Feather and make a selection like below. This will be the tail of our spoon.

STEP 25
Grab the Gradient Tool (G) and fill it with a gradient like below.

STEP 26
Place all these layers into a new layer group. Name it “teaspoon”. Now duplicate this layer group and merge all layers within it. Turn off visibility of the original layer group. (View STEP 5)
Double-click the newly merged layer to pop up the Layer Styles menu. Use these settings below.

Now place it above the plate like below.

STEP 27
Let’s create a message to put on our image! We’ll use a handwritten text typed with milk. Use the Horizontal Type Tool (T) and click our image. Type in “Good morning!” or any other text you want. It will do nicely. Set its color to white. (#fafafa).

STEP 28
Open the Splatter vector. Copy it and paste it in our drawing. Notice it’s true black, not quite the milky color, eh ? Let’s fix that. Double-click the newly created layer in the layer palette (F7)
and check the Color Overlay. Click that tab and set the color to white. I used #fafafa. Hit OK.
STEP 29
Select these two layers (SHIFT+click) and merge them (CTRL+E). It should look like below.

It’s a bit plane and with no volume, isn’t it? Let’s fix that too.
Double-click the layer icon on the layer palette to pop up the Layer Styles menu and use these settings below.


That’s it !
Thank you soooo much for sharing; this is beautiful, nice job:)
This is really good. Great Job!
hey vector seamless pack.. i am a newbie.. waht is that???
You spelled what wrong.
a seamless pack is a collection of seamless patterns (a texture that can repeat itself if you put the images one near other).
Hey very cool write up! I ran into an issue creating the coffee, though. I used the marquee to select the circle area, plugged in the colors, but the render clouds stayed B&W. Was there an extra step i’m missing here?
If you mean STEP 20, you need to pre-define the colors in the boxes from the bottom side of your tool bar. Just double-click each and type the color codes.
im black and i want to lick your butthole
Hello, Mr. Internet troll (:
are you fucking kidding me this is the worst tutorial ive ever seen.
nice one
I appreciate your art, it’s useful to me, keep going up
Hey mate, thanks for the AWESOME tutorial, just what i was looking for my project at work.