100% Non-destructive manipulation: Create a glamour scene in Photoshop
In this tutorial we will create a glamour scene manipulating photos in a non-destructive way. In short, the file will contain the original images used and you can always return to any point and tweak a few details.
Difficulty: Intermediate – Advanced
Completion time: 5-6 hours
Tools: Adobe Photoshop CS3
Resources:
– Girl from SusanCoffey
– Cloud Brushes from JavierZhx
– Dill
– Rose
– Flower brushes from Designious
– Birds brushes from Designious
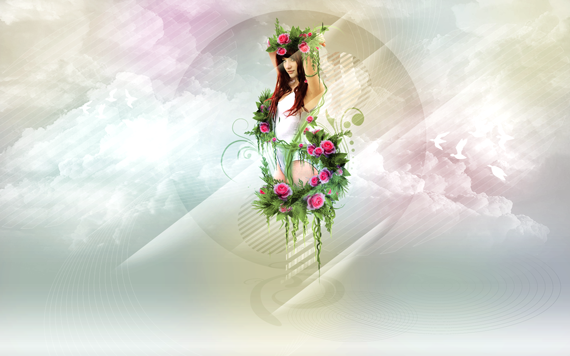
What you’ll be creating
Note: For Mac users, the correspondent keys for CTRL and ALT are CMD and OPTION.
STEP 1
Create a new document of 1680 x 1050 px in RGB color mode at 72 dpi.

STEP 2
Open the “Girl” picture.
In the Layers palette, double-click the “Background” layer lock and hit OK in the pop-up window. This will make the layer editable.

STEP 3
Go to Image > Lab Color. Open the Channels palette (Windows > Channels) and click-drag the “a” channel on the “New Channel” icon. Now you’ll have a copy of that channel.

STEP 4
Go to Image > Mode > RGB. Click the “a copy” channel. Go to Image > Adjustments > Levels (CTRL+L) and set the cursors to the minimum and max values, like in the image below.
Repeat this step until you get a high contrast between the background and the hair.

STEP 5
Use the Pen Tool (P) set on Paths and trace the body, leaving out the hair strands. Then right-click > Make selection of 1 px Feather.

STEP 6
Use the Brush Tool (B) and paint the inside of the selection. Make sure you cover it entirely.

STEP 7
Grab the Magic Wand (W) and select the white. Now open the Layers palette and click the “Add layer mask” icon.

STEP 8
At this point, we have a rough mask for our image. To smooth it out, select the mask and paint over with black the unwanted areas using the Brush Tool (B).
This is how the final mask looks like.

STEP 9
Go to Window > Cascade and drag-drop the layer into our document and make it a bit smaller. Now open the Lemon balm leaves, select all (CTRL+A), copy it (CTRL+C) and paste it (CTRL+V) in our document.

STEP 10
Go to Edit > Free Transform (CTRL+T) and resize it. Grab the Magic Wand (W), select the background of the leaf (the white part) and go to Select > Inverse (CTRL+SHIFT+I). In the Layers palette, click the “Add Layer Mask” icon.

STEP 11
In the Layers palette, create two new layer groups (click the “New Layer Group” icon). Double-click their names, rename each “bouquet” and “girl” and drag the “girl” layer in the “girl” layer group. Do the same for the “Layer 1” – drag in the “bouquet” layer group.

STEP 12
In the Layers palette, select the “Layer 1” layer, go to Edit > Free Transform (CTRL+T), resize it and rotate it. Hit Enter.

STEP 13
Go to Layer > Duplicate Layer… (CTRL+J) and rearrange the newly created layer. Repeat this step two more times, make it look like below.

STEP 14
Open the “Dill” image. Go to Image > Mode > Lab Color. In the Channels palette (Window > Channels), drag the “a” channel on the “New Channel” icon. Then go back to Image > Mode > RGB.

STEP 15
With the “a” channel selected, go to Image > Adjustments > Curves and modify the curve similar to the one below.

STEP 16
Go to Image > Adjustments > Levels and move the cursors to obtain a very high contrast between the green leaves and the rest of the picture.

STEP 17
Go to Select > Color range and click somewhere in the white area. Hit OK. You should see a “marching ants” selection. Open the Layers palette (Window > Layers), click the tumbnail, then click the “Add Layer Mask” button.

STEP 18
Select the layer mask, then grab your Brush Tool (B) and paint over the unwanted area with true black (#000000).

Your final selection should look like below.

STEP 19
Go to Window > Arrange > Cascade, then drag the Layer into our document. Go full screen again. Place this in the “Bouquet” layer group above all other layers in the group.

STEP 20
Go to Edit > Free Transform (CTRL+T), make it smaller and place it in a similar position like I did.

STEP 21
Open the “Rose” image. Go to the Channels palette (Window > Channels) and drag-drop the “Blue” channel on the “New Channel” button.

STEP 22
With the “Blue” channel selected and the others turned off, go to Image > Adjustments > Curves and drag the graph similar to mine or until you remove almost completely the midtones. Hit OK.

STEP 23
Grab your Brush Tool (B), press D to restore to defaults the colors and paint over the midtones in the channel. Vary the brush dimension to do this quicker (CTRL+SHIFT+[ and CTRL+SHIFT+]).

STEP 24
Return to the Layers palette (Window > Layers) and double-click the lock on the layer. Hit OK. In the Channels palette, turn on visibility of RGB and off the visibility of “Blue copy”. Then CTRL+click the “Blue copy” channel, move to Layers palette, select “Layer 0” layer and click “Add Layer Mask” button.

STEP 25
Go to Window > Arrange > Cascade. Then click-drag this layer into our document. Place it in the “bouquet” layer group. Double-click its name and rename it “rose”. Resize it to look realistic in the bouquet, like below.

STEP 26
Now the fun begins!
Select the layer with the “Dill” and go to Layer > Duplicate layer. Press CTRL+T for Free Transform, resize it, rotate it and right-click > Flip Horizontal. Rearrange it as you see fit.

STEP 27
Repeat STEP 26, but for the “rose” layer. Resize, rotate, reflect, mix them as you like… go wild with it!
This is how my result looks like.

STEP 28
Drag the layer group on the “New Layer” button, go to Layer > Merge Layers (CTRL+E) and place the newly created layer in the “bouquet” layer group above all other layers.

STEP 29
With the “Bouquet copy” layer selected, go to Layer > Layer Mask > Hide all. Set the layer Blending Mode to Multiply in the Layers palette. Now grab your Brush Tool (B), set Hardness to 0% and draw the areas you want darkened.
Feel free to adjust the brush opacity for different tones of shadow.

STEP 30
Select the “bouquet” layer group in the Layers palette and click-drag it on the “New Layer” button. Select the top-most layer from inside the “bouquet copy 2” layer group and click the “Delete layer” button.
Repeat STEP 29, but make the whole shape smaller (hit CTRL+T), then resize it.

STEP 31
Copy the “bouquet” layer group again like in STEP 28. Select it in the Layers palette (Window > Layers), go to Edit > Free Transform (CTRL+T) and rotate it. Also make it smaller, then hit Enter. Make it look like mine.

STEP 32
Go to Layer > Layer Mask > Reveal all. Now grab the Brush Tool (B), click on the mask’s thumbnail in the Layers Palette, press D to restore colors to defaults, press X and start painting over the areas you want hidden, something similar to the image below.

STEP 33
Select the “girl” layer, go to Layer > Duplicate Layer (CTRL+D) and place it above the “bouquet copy 3” layer group. Select its layer mask, grab the Brush Tool (B) and paint over the whole body, leaving only the strands of hair that come over the bouquet.

This is how it looks like with masking.

STEP 34
Go to Layer > New Layer (CTRL+SHIFT+N), set blending mode to Multiply and place it above all layers. Grab the Brush Tool (B), set Hardness to 0% and a dark gray color. Now start painting some shadows. Feel free to adjust Opacity and Flow of the brush for different tones.

STEP 35
Go to Layers palette (Window > Layers) and create a new layer group. Name it “vines”. Create a new layer and place it in this layer group. Grab the Pen Tool (P), set it on Paths from the top left corner button and draw a shape similar to the one below. Then right-click > Stroke path…

STEP 36
Set it to “Brush” and check “Simulate pressure”. To set the brush, select your Brush Tool (B) and set Hardness to 100% before you draw the path.

You should have something similar to below. If you want a thicker line at the bottom, simply start the path from a lower point.

STEP 37
Go to Layer > Layer Style > Blending Options (double-click near the layer thumbnail in the Layers palette) and use the following settings.
Outer Glow: 12% Spread, 4 px Size. Leave the rest as defaults.

Inner Glow: A bright green color, 0% Choke, 5 px Size. Leave the rest as defaults.

Color Overlay: Normal Blending Mode, a midtone green color, 100% Opacity.

This is how the image looks after these effects.

STEP 38
Select this layer and go to Layers palette and click the “Add Layer Mask” button. Grab your Brush Tool (B), select the layer mask, hit D to restore colors to defaults, hit X to switch between colors and start painting some areas to make it look like below.

STEP 39
Repeat STEPS 36-38 and create another shape similar to this one.

STEP 40
Expand the “bouquet”, select a layer with a leaf, then go to Layer > Duplicate Layer. Then drag-drop it in the “vines” layer group.
Go to Edit > Free Transform (CTRL+T) and resize it, reflect it, rotate it as you see fit. Duplicate a few times and place leaves along the vines.

STEP 41
Repeat STEP 40, but this time for the “rose” layer”. This part is fun, go wild with it !

STEP 42
Go to Layers palette and create a new layer in the “vines” layer group. Place it below any other layer in this group and set its Blending Mode to Multiply.
Grab the Brush Tool (B) and a dark gray and start adding some shadows. Feel free to change the brush’s and layer’s Opacity for different tones.

STEP 43
Select the top-most layer in “vines” layer group and go to Layer > New Layer (CTRL+SHIFT+N). Name it “vine handmade”. Grab the Brush Tool (B) and draw thin, random lines. Hold ALT key and pick a green color from canvas (from leaves, e.g.)
Do this with different tones of green. Here’s my result.

STEP 44
Repeat STEP 43 and create vines below the “bouquet” layer group. Name the layer “hanging vines”.

STEP 45
Select the “hanging vines” layer and go to Layer > Duplicate layer (CTRL+J). Go to Edit > Free Transform (CTRL+T), make it smaller and place it in a similar manner like I did.
Feel free to do this in more areas.

STEP 46
Select the “bouquet” layer group and drag-drop it on the “New Layer” button. Go to Edit > Free Transform; rotate it and make it smaller. Hit OK, then place it like in the image below.

STEP 47
Repeat STEP 45 and place the vines like this.

STEP 48
In the “vines” layer group, create a new layer and place it below any other layer in the group. Set Blending mode to Multiply. Grab the Brush Tool (B), Set Hardness to 0% and start painting the shadows of the vines on the girl’s body.
Feel free to adjust the layer’s and brush’s Opacity for different tones.

STEP 49
In the “girl” layer group, select the “girl” layer. Go to Layer > Duplicate layer (CTRL+J), then go to Layer > Layer Mask > Hide All. Set blending mode to Multiply.
Grab the Brush Tool (B), select the layer mask and start drawing on the areas you want darkened (elbows and forehead). Adjust the brush’s Opacity for different tones.

STEP 50
Select the “Background” layer. Grab the Gradient Tool (G), click on the gradient in the top left corner and set it similar to below. Make sure it’s linear gradient.

STEP 51
Hold the SHIFT key and click-drag from the bottom edge to the top edge. your background should now look like this.

STEP 52
Create a new layer group and name it “clouds”. Also create a new layer in it. Open the “cloud brushes”. Select the Brush Tool (B), open the Brushes palette (F5), select a cloud brush and start clicking around.
Click multiple times for more intensity. Try doing something similar to the image below.
Tip: create more layers so you can move them around as you like.

STEP 53
Create a new document of 1000 x 1000 px. Grab the Ellipse Tool (U) and draw a large circle. To draw it perfect, hold ALT+SHIFT keys. Also give it a random color.

STEP 54
Grab the Rectangle Tool (U) and draw a shape like below. Use a dark color.

STEP 55
Select the layer with the rectangle, then go to Layer > Duplicate Layer (CTRL+J). Move it a bit lower.

STEP 56
Repeat STEP 55 until the circle is covered up.

STEP 57
In the Layers palette, select the third layer from bottom. Hold SHIFT key, click to top-most layer, then on the top toolbar click the “Vertical Distribute Center” button. Then go to Layer > Merge Layers (CTRL+E).

STEP 58
Create a new layer above the “Shape 1” layer, select both layers and go to Layer > Merge Layers (CTRL+E).
CTRL+click the layer’s thumbnail in the Layers palette, select the “Layer 1” layer and hit Delete key.

STEP 59
Go to Window > Arrange > Cascade, click-drag this layer into our document. Set Blending mode to Color Dodge, Opacity to 25%, Fill to 20%.
Feel free to add any shapes you like, there are no limits.

STEP 60
From the “girl” layer group, select the “girl” layer and go to Layer > Duplicate Layer. Bring the “Layer 1” from the document created in STEP 53 and place it below the duplicated layer. Then move these layers in the “shapes” layer group.
Hold the ALT key and click between the layers.

STEP 61
Move the duplicated layer to the right, set the shape’s Blending mode to Overlay and Opacity to 65%. You should now have something similar to this image.

STEP 62
Select the “Layer 1” with the shape created in STEP 53. Go to Layer > Layer Mask > Reveal all, grab the Brush Tool (B), hit D, then X and paint over the extra areas.

STEP 63
Select “Layer 1” layer again, go to Layer > Duplicate Layer (CTRL+J), set Blending Mode to Overlay, Opacity to 50%, resize it and go to Image > Adjustments > Desaturate (CTRL+SHIFT+U).

STEP 64
Select the top-most layer group in the Layers palette (Window > Layers or F7), create a new layer group and name it “Lights”. Create a new layer and place it in the group. Now grab the Rectangular Marquee Tool (M) and draw a rectangle like below. Make sure Feather is 0 px.

STEP 65
Grab the Gradient Tool (G), select black-to-white gradient, hold SHIFT key and apply it from top to bottom on our selection. Go to Select > Deselect (CTRL+D).

STEP 66
Set blending mode to Screen, go to Layer > Layer Mask > Reveal All. Grab the Brush Tool (B), press D, then X, select the layer mask and paint over the areas shown below.

STEP 67
Duplicate this layer (CTRL+J) a few times, resize some of them and move them randomly around.

STEP 68
Create a shape similar to the one below by following STEPS 53-58.

STEP 69
Create this shape from a random area by following STEPS 59-61 and the shape from STEP 68.

STEP 70
Select the “Background” layer. Create a new layer group above it and name it “florals”. Create a new layer and place it inside the group.
Open the “Florals” .eps file, grab the Polygonal Lasso Tool (L) and roughly shape up a flower. Copy it. (This is the flower i chose).

STEP 71
Select the layer in the “florals” group. Go to Filter > Vanishing Point (CTRL+ALT+V). Click the spots indicated in the image.

STEP 72
Press CTRL+V. You should now have pasted the flower. Now simply drag-drop it onto the perspective plane you created. Hit OK. Reduce layer Opacity until you like what you see.

STEP 73
Add more flowers around the girl. Then select layer, go to Layer > Layer Style > Blending Options. Select Color Overlay and give it a midtone green.

STEP 74
Create a new layer above all layers. Grab the Brush Tool (B) and draw large, soft spots using different vibrant colors.

STEP 75
Set layer blending mode to Soft Light and set Opacity to 75%. Open the “birds” brushes and add random birds like in STEP 73 (on a new layer).

STEP 76
As a final touch, we will add some adjustment layers.
Go to Layer > New Adjustment Layer > Exposure. Use the settings below.

Go to Layer > New Adjustment Layer > Selective Color.

Go to Layer > New Adjustment Layer > Selective Color.

Done!
A larger version of the final image is available for download in the link below, so… download!
[download id=”153″]


Tutorial added to the web tuts !
wow…huge manipulation …great share indeed…thanks…
Excellent…..Love it
Thanks tutorial added to Tutorial River. Excellent tutorial too..
Amiable brief and this mail helped me alot in my college assignement. Gratefulness you seeking your information.
very precise job. Gratulation
Good Job done… very interesting tutorial
another technique learned… thank you so mch!!!
KUDOS to you brother
wow, thanks for this really detailed tutorial
very artistic.. we can make pure photo of girl to be like this… cool
Good fill someone in on and this mail helped me alot in my college assignement. Thanks you as your information.
wow :-O thankyou
O boy…great one indeed..thanks for sharing d..
Fantastic Tutorial. I Like This Tutorial Very Much. Thank You For Posting This Tutorial.
Great tut, so much to learn :) Thank you for your effort.
its cery creativity so nice.
thankyou
wow looks great
Did I miss the part where you put the bubble around her?
Very neat tutorial. I want to do this for my fiance now!
Amazing tutorial. Learnt the total thing.
just created one . thanks
This is a very valuable post if you know how to use it you can benefit a lot from it but if you just read all the information contained in it and avoid it it will not be of any use to you I have learned a lot from this post and I hope From these I learned that the information could be used very well in the future. I sincerely thank him for writing this post.