How to Create a Spectacular Nature Composition in Photoshop
Today we will create an abstract composition by combining stock vectors, photos and brushes. Along with creating your image, you will learn now to:
– create interesting compositions
– use blending properties
– use layer masks
– make cutouts
– photo retouching and enhancement
Difficulty: Beginner
Completion time: 40 min
Tools: Photoshop CS3, Illustrator CS3 (Optional)
Resources:
– Floral Vector Pack 84 from Designious.com
– glass from mmp-stock
– leaves from phantompanther-stock
– cloud brushes from XavierZhX
– lemons from setsuna22
– brush from fairiegodmother
– desert from phantompanther-stock
– fish from phantompanther-stock
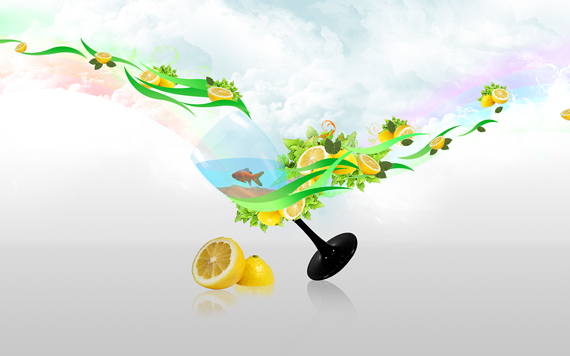
Final image preview

STEP 1
Create a new document of 1680 x 1050 px at 72 dpi in RGB color mode.

STEP 2
Grab the Gradient Tool (G), create the gradient below and click-drag it like below.


STEP 3
Open the “glass” picture. Now grab the Pen Tool (P), set it on Paths and trace the outline of the glass. Then right-click > Make Selection, set it to 0 px and hit OK. Copy it (CTRL+C), go back to our document and paste it (CTRL+V). Go to Image > Adjustments > Desaturate.


STEP 4
Go to Edit > Free Transform (CTRL+T), rotate it and resize it like below. Hold the SHIFT key to preserve its proportions. Then hit Enter to exit Free Transform mode.

STEP 5
Extract the “lemons” pack in a folder of your choosing. Then click-drag one of the pictures into Photoshop. Make a cutout of the lemons like in STEP 3, then paste it into our drawing.


STEP 6
Repeat STEP 4 to make the lemon look like below. Go to Image > Adjustments > Brightness / Contrast and use the settings below.

STEP 7
With the lemon selected, grab the Selection Tool (V), hold the ALT key and click-drag it to the right. Then hit CTRL+T to enter Free Transform mode and make it smaller.

STEP 8
Create more copies of lemons, but keep in mind to make them smaller and more distant to one another the further they are from the glass.

STEP 9
Open the “leaves” picture. Grab the Crop Tool (C) and crop the image leaving out the frame. Double-click the lock in the Layers palette (F7) and hit OK. Go to the Channels window (Window > Channels) right-click the Blue channel and select “Duplicate channel”.


STEP 10
Go to Image > Adjustments > Curves. Adjust the curve like below. Then go to Image > Adjustments > Levels and use the settings below. Repeat this until the shadow (respectively, midtones) disappear completely. If you see jagged edges, then you’ve overdone it.


STEP 11
CTRL+click the “Blue copy” channel’s thumbnail, go back to the Layers palette (F7) and hit Delete.

STEP 12
Grab the Polygonal Lasso Tool (L) and select a leaf. Copy it and paste it into our document. Hit CTRL+T to enter Free Transform mode, resize it and place it like below.

STEP 13
Grab the Selection Tool (V), hold the ALT key and click drag multiple copies of the leaf. Resize and rotate each to fit the scenario.


STEP 14
Open the “brush” picture. Grab the Magic Wand Tool (W), click the background and hit Delete.
Grab the Eraser Tool (E) and clean up the remaining areas.

STEP 15
Grab the Polygonal Lasso Tool (L), select a part of the leaves, copy it (CTRL+C), go back to our document and paste it (CTRL+V). Resize it and rotate it to fit like below.

STEP 16
Create copies like we did with the lemons.

STEP 17
Grab the Path Tool (P), set it on Shapes and draw a shape like below.

STEP 18
In the Layers palette (F7), select the shape layer you just created and click the “fx” and select Blending Options. Use the settings below. Hit OK.

STEP 19
Right-click on the vector mask of the shape layer and select “Rasterize Layer”.
STEP 20
Go to Layer > Layer Mask > Reveal All. Then grab the Brush Tool (B), set Hardness to 0%, select the layer mask, make sure the Foreground color is black and paint the area shown below.


STEP 21
Go to Layer > Duplicate layer (CTRL+J). Hit CTRL+T to enter Free Transform mode and click-drag the rotation center to the bottom right corner of the bounding box. Then rotate it a bit clockwise. Hit Enter.

STEP 22
Double-click the “fx” icon near the layer thumbnail. Change the “Color Overlay” color to a light orange. Hit OK. Then hit CTRL+J to duplicate the layer.

STEP 23
Repeat STEPS 21-22 for multiple colors shapes: yellow, green. (Yup, you guessed it, I want to create a rainbow.)

STEP 24
Select all the shape layers you created so far and hit CTRL+G) to place them in a layer group. Double-click the layer group’s tag and rename it to “rainbow-left”.

STEP 25
Repeat STEPS 17-24 for the shape below.


STEP 26
Select all the shape layers you created after STEP 25 and hit CTRL+G) to place them in a layer group. Double-click the layer group’s tag and rename it to “rainbow-right”.

STEP 27
Open the “cloud brushes”. Just double-click the .abr file, it will load them into Photoshop. Go to Layer > New > Layer (CTRL+SHIFT+N).

STEP 28
Grab the Brush Tool (B), hit D, then X (resets foreground and background colors and switches between them), select a cloud brush and paint over the rainbow. Experiment with different brushes.


STEP 29
Grab the Pen Tool (P) and draw a shape like below. Then go to the Layers palette (F7), click the “fx” button and select “Blending Options”. Use the settings below.


STEP 30
Grab the Selection Tool (V), hold the ALT key and click-drag it to create multiple copies. Resize and reflect them similar to the image below.


STEP 31
Create a new layer (CTRL+SHIFT+N) and place it below the “rainbow-left” layer group. Now grab the Brush Tool (B), select a cloud brush, set Foreground color to a light sky blue and paint some clouds. Experiment with different opacity of the brush to add more perspective.

STEP 32
Grab the Selection Tool (V), check the “Auto-Select” box and click the glass. Then hit CTRL+G to place it in a layer group. Double-click its name and rename it to “glass”.

STEP 33
Grab the Path Tool (P), set it on Paths and trace the cup part of the glass, like below. Then right-click > Make Selection. Switch to Rectangular Marquee Tool (M) and right-click > Layer Via Copy.

STEP 34
Duplicate this layer (CTRL+J), CTRL+click the newly created layer to load a selection, Then go to Select > Modify > Contract. Set it to 4 px and hit OK. Hit Delete and set the Blending mode to Overlay and Fill to 0%. Also click the “fx” button and select “Blending Options”. Use the settings below.

STEP 35
Grab the Selection Tool (V) and select the layer below your current one. Go to Image > Adjustments > Hue/Saturation. Give it a sky blue tint (use the settings below).

STEP 36
Cut out the lemons shown below and paste them into our drawing.


STEP 37
Resize it, go to Image > Adjustments > Brightness/Contrast. Use the settings below or similar.


STEP 38
Grab the Pen Tool (P), set it on Paths and Layer Via Copy the left half of the lemon. Then hit CTRL+T, right-click > Flip Horizontal and place it like below.

STEP 39
Grab the Eraser Tool (E), set Hardness to 0% and erase the part shown in the image below. Set Fill to 25%.

STEP 40
Repeat STEPS 38-39 for the right side of the lemon, but copy only half, reflect it horizontally, duplicate the copy (CTRL+J) and reflect it vertically. Also do the same for the glass.

STEP 41
Open the Floral Vector Pack 84 and click-drag one of the flowers into our drawing. In the Layers palette (F7), click the “fx’ button and select “Blending Options”. Use the settings below. Use the Selection Tool (V) and ALT+Click to place copies of the flowers.


STEP 42
Grab the Selection Tool (V), check the Auto-Select box and select the glass. Grab the Path Tool (P), set it on shapes and trace the glass’ edges, like below. Give it a nice, sky blue color. Hit CTRL+T, rotate it and make it fit, like below. Set Fill to 50%.


STEP 43
Repeat STEP 43, but use the settings below. Open the “fish” picture. Grab the Path Tool (P), set it on Paths and trace the fish. Then right-click > Make Selection. Copy it (CTRL+G), go to our document and paste it (CTRL+V). Resize it to fit the glass, to make it look like it’s in a bowl. Do the same for the sand.

STEP 44
Select the top-most layer and go to Layer > New Adjustment Layer > Hue/Saturation. Use the settings below.

STEP 45
Select all artwork CTRL+A), copy merged (CTRL+SHIFT+C) and paste it (CTRL+V).

STEP 46
Go to Filter > Sharpen > Sharpen.

Done!

You can download the source file from the link below:
[download id=”168″]
Wow, thats one long tutorial!
Thanks for taking the time to make it such detailed, I found it really useful :)
beautiful scene
Great article..this is very useful tutorial..i will try this on my on…thanks for sharing…
This was a really fun tutorial! Thanks for taking the time to share your skill.
wow
good work
Amazing and beautiful results after long tutorial. Thanks.
The instruction manual is too detailed.