How to create double exposure effect in Photoshop
Editing and enhancing images using photoshop is a thing of the past. Double exposure in photoshop is one of the modern-day technologies for us. In the following article, we will tell you about the double exposure effect, How to apply this effect? And how to get the desired results?
What is Double Exposure effect?
Double exposure in photoshop means merging two images into each other using different blending modes and clipping masks. This effect involves the exhibition of two images on the same film to create a single image. This effect can be applied easily using Adobe Photoshop.
Create this effect in just a few clicks:
You can create this bewildering effect by blending double exposure with photoshop action. Add color gradient and other effects to complete your editing. Combining your pictures with ready-made wallpapers can help you save time by creating jaw-dropping images with only a few clicks. The only downside to double exposure pictures is that they might not work with reverse image search tools.
How to start:
If you want to learn about making a double exposure effect, then you are at right place. In the following article, we will teach you how to master this effect using different tools and features. To create creative and bewildering photos, you have to learn blending modes, color gradient effects, and clipping masks. You will get a stepwise guide about creating these effects.
You can use two or more pictures for creating a double exposure in photoshop. You can blend different wallpapers or your images or both. But make sure to start with simple examples to ensure your success.
Step 1: Selecting the Main photo:
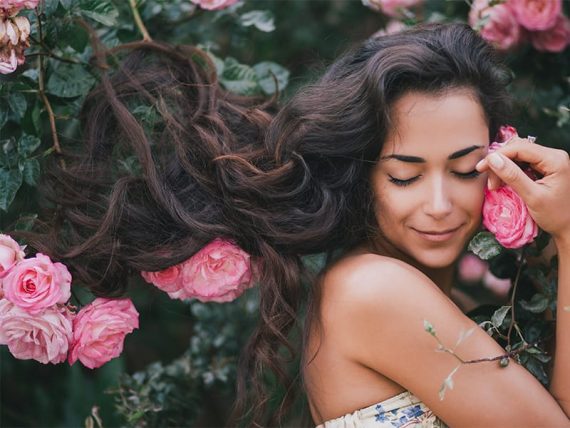
Whether you are combining two photos or ten, the first step is to choose and prepare the main picture. For the base or main photo, we will use the following image to explain this effect clearly. The main photo should be plain and straightforward without any noisy background such as grass or greenery.
Crop the unwanted parts of the image by using the crop tool.
Step 2: Adjust Brightness and Contrast
To make sure that you get the best result, change brightness and contrast from Adjustments. Move the sliders to left or right to increase or decrease the intensity. Contrast can be adjusted the same way i.e., by moving the dark slider.
Step 3: Minor Healing Brush Tool
Use the tool name Spot Healing Brush to get rid of minor imperfections. All you have to do is to move your mouse over the area that you wish to fix, and all defects are gone. This tool is used to even out the skin surface or to remove minor bumps or wrinkles from pictures.
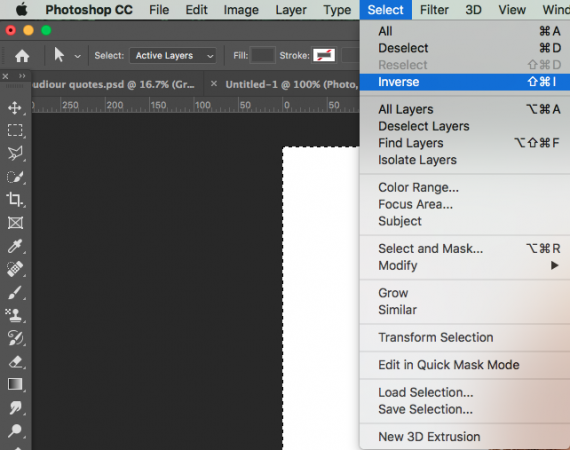
Step 4: Get Rid of Background
In the next step, delete the background to get a clear Main image. If you are using a transparent background, it will be easier to remove it. Click anywhere on it by using the Magic Wand Tool. Click on Select> Inverse to remove the background completely.
But this step is complicated if you are using a picture with a noisy background. Use selection Brush to outline your desired object ( the part of the image that you want for the main image ).
But in the following example, this step is not necessary as we are using a simple picture.
Step 5: Refine Edges
Once you have selected the image, you can also use the refine edge option to get a clear image. You can refine edges more profoundly using the Magic Wand Tool. To get a more refined picture, you can increase the edge radius. You can choose to make edges smooth or blurred. If it is difficult to refine edges due to the messy background, then this blur option is used.
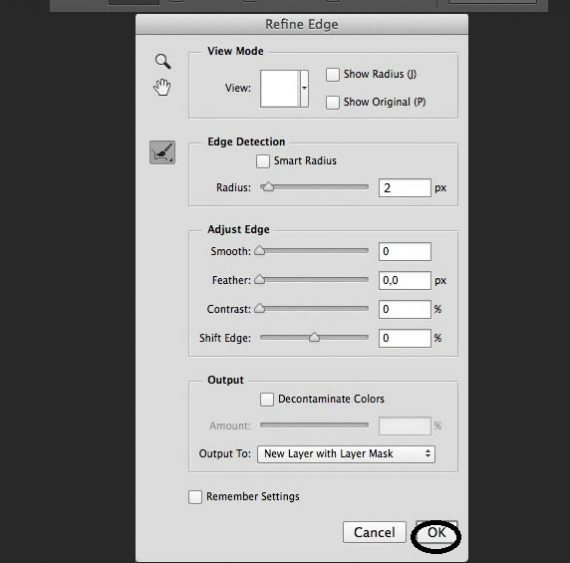
Make sure to select the “OK” option at the bottom to save your settings.
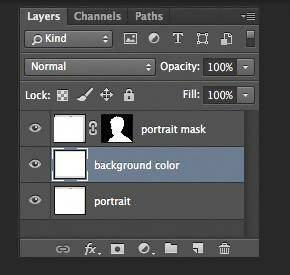
Place your image temporarily on a white or black background to make the edges more visible. If the edges are not fine, then return to the previous step. To make sure that your double exposure effect is at its best, you have to master clipping masks. After edge refinement, choose the option New Layer With Layer Mask in output. This will show you a copy of your refined picture on a masked background.
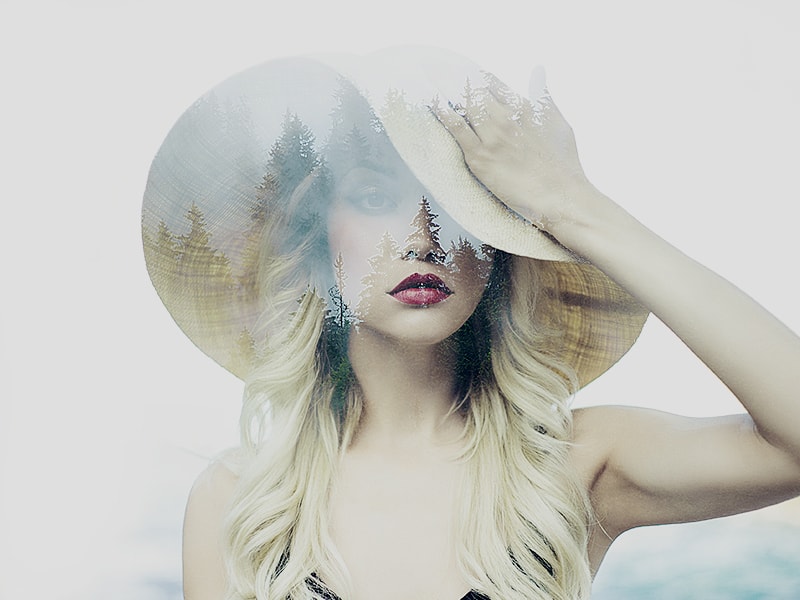
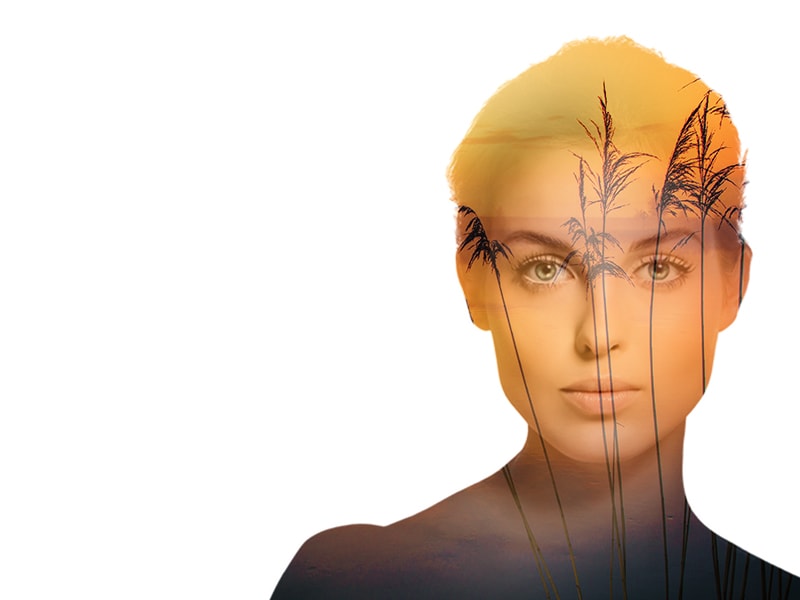
An example of Double Exposure effect In Photoshop is as follows.
Step 6: Add Double Exposure Effect
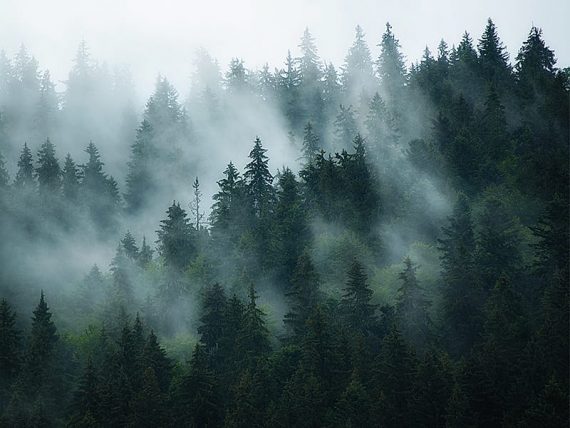
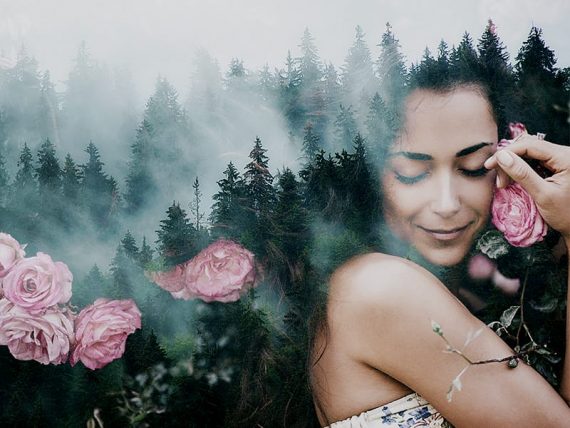
Now choose the second picture for the background. Mostly the second or background image is landscape, city view, or greenery. We will use a simple idea for giving an example.
Next step is to merge both images. Drag the main picture on the second image and release it where you want it to be. Both photos will be present in separate layers. Use Vector Mask to hide unneeded parts of the picture. Rotate or move your primary photo for desired results. Or Clip the layer to fit the main photo.
Cropping:
Use crop option to make further adjustments. Do not select “delete Cropped pixels” option to reposition your photo later.
Step 7: Colorizing the photo:
Coloring is the primary tool for expressing your ideas and themes. The best types of double exposure photos are those who have black and white colors. But if you wish to add more colors you can. Make sure to choose well defined and high contrast pictures. Such photos are perfect for adding a double exposure in photoshop. Moreover, you can also add a colored background as the third layer. Use the Paint Bucket tool to color the background.
Coloring the background will help in bending the original picture with the background. Add coloring effects to shadows for better blending. You can also increase or decrease the opacity of colors.
Once you have chosen a color contrast for your photo, you can stop here because your double exposure effect in photoshop is complete. But you can also add other cool effects by using different tools to create an even better picture.
Step 8: Additional Changes
Masking the effects
Using adjustment layers and layer masks help you get a better result. You can bring parts of the main photo back and blend them with the second layer for getting bewildering effects. Well, a lot of effort and experimentation is required to master applying this effect. But once you have learned using smart objects, this will not be a problem. Start working with small portions to avoid the risk of destroying your picture.
Blending Modes
Blending is a crucial step in adding a double exposure effect. You can isolate various parts of your image to make them more visible than others. To get better result use this effect in combination with adjustment layers. Numerous tutorials are present on the internet to learn this.
Change Intensity
In order to increase the intensity of your images combine them with other pictures. Combine landscape, cityscape or greenery with your photos to create unique pictures. Learn to blend trees and forest landscapes with hairs to create weird images. You can also use images with rich textures to increase the tone of your original picture.
Best way to master any skill is experimentation. Once you start experimenting with double exposure in photoshop, you will learn to create amazing and unique photos. This effect is used widely in producing fantastic wedding pictures with different themes or backgrounds. You can add flowery backgrounds or landscapes of your own choice. Original themes and ideas are vital to get the best results. Whether you want to display your thoughts through your photography or create some amazing and unique pictures, this double exposure effect covers it all.
Read more: exposure & color correction services
Using adjustment layers and layer masks help you get a better result.
Wow. Great effect!
Another fantastic job.
Very Good Information for Street Photographers. really helpful
I was really ignorant about the subject (double exposure effect in Photoshop) you posted about but after reading this post I learned a lot of good things and now I can say that I am not ignorant about this subject anymore. Thanks for making such a beautiful and instructive post.