Create Candy Cane Typography with Photoshop and Illustrator
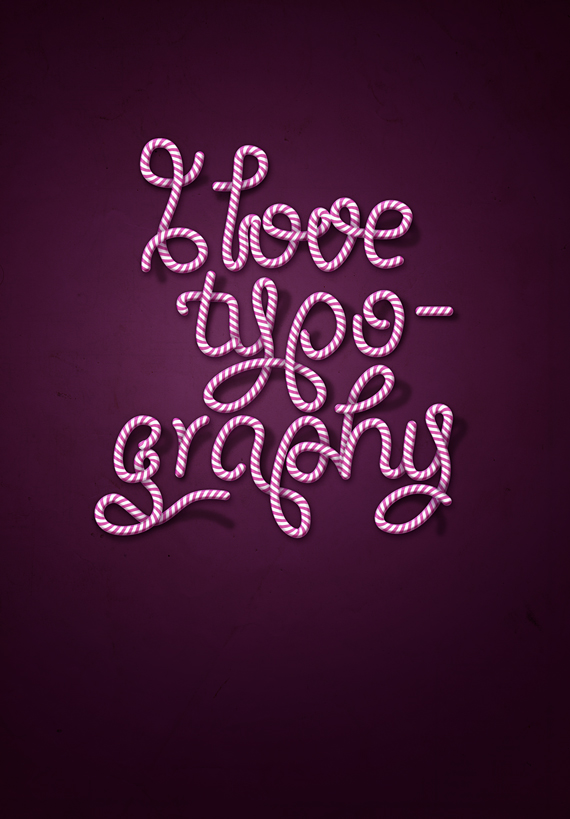
In this tutorial we will create a superb candy cane type design using Illustrator and Photoshop. Apply this effect to your own text and create cool and unique Christmas cards!
Along with creating this, you will learn how to:
– create advanced vector pattern brushes
– customize blending modes in Photoshop
– create shading and lighting
– retouch photos to fit the same scenario
– create backgrounds for your image
– use adjustment layers
Difficulty: Intermediate – Advanced
Completion time: 1 hour
Tools: Illustrator CS3, Photoshop CS3
Resources:
– paper texture from bashcorpo
Candy Cane Typography Final Image
STEP 1
Open Illustrator and create a new document of “Letter” setting in CMYK color mode at 72 dpi.

STEP 2
Grab the Rectangle Tool (M) and draw a gray rectangle like below.

STEP 3
Draw another rectangle, but make it a lot thinner than the previous. Also change its color to red or another color contrasting the first.

STEP 4
Grab the Selection Tool (V) and rotate the second rectangle. You don’t have to be very precise with it, just follow your artistic sense.

STEP 5
Hold the ALT key and click-drag the red rectangle to the right. Hold SHIFT key while dragging to move it orthogonally.

STEP 6
Hit CTRL+D three times. This will duplicate your last command input – in this case, copying a shape.

STEP 7
Select the gray rectangle lengthen it a bit, copy it (CTRL+C) and paste it to front (CTRL+F). Hit CTRL+SHIFT+] to bring it in front of the other shapes.

STEP 8
Remove its Fill, select all the red rectangles and right-click > Make Clipping Mask. Select all artwork (CTRL+A) and hit the Merge button. Then paste in front a copy of the merged shape (CTRL+C > CTRL+F). Grab the Eraser Tool (SHIFT+E), hold the ALT key and erase the left side, along with a part of the red stripe.


STEP 9
Move the copied shape to the right until the first red stripe aligns with the second stripe from the shape below it. Reduce Opacity to see it better. Now select the shape above and set its Fill color to black.


STEP 10
Grab the Selection Tool (V), select the black rectangle, hold the ALT key and click-drag the middle distortion point, like below.

STEP 11
In the Pathfinder window (Window > Pathfinder), click the Merge button. Then select all artwork and hit Merge again. Grab the Direct Selection Tool (A), select the black rectangle and hit Delete.

STEP 12
Select all artwork and click-drag it into the Brushes palette (F7) Set it to “Pattern Brush”. Grab the Path Tool (P) and draw a long straight path. Then click the brush you just created. This is a good way to check if your pattern is correct.


STEP 13
Click the Grab the Ellipse Tool (L) and draw a circle. Hold the SHIFT key while click-dragging to make it perfect.

STEP 14
Click the rectangular shape and copy the Height value from the top menu bar. Select the circle and paste this value to Width and Height.

STEP 15
Select both shapes and align them to horizontal axis. CTRL+click near the design to deselect, then grab the Direct Selection Tool (A) and select the left side anchorpoint of the circle and hit Delete. Align


STEP 16
Grab the Selection Tool (V) and align the resulting shape like in the image below. Slect the rectangle and ALT+click-drag to create a copy. Realign the copy with its original, just like in STEP 9.

STEP 17
Select the half-circle, remove its Fill, hold SHIFT and click the rectangle behind it. Now right-click > Make Clipping Mask. In the Pathfinder window (Window > Pathfinder), click the Merge button.


STEP 18
Open the Swatches palette (Window > Swatches) and click-drag the resulting shape into the palette. Name this “candy-end”. In the Brushes palette (F5), select our brush. Make sure you have everything deselected (CTRL+click in a blank area).

STEP 19
Open the dropdown menu and select Options. Click the last box and select “candy-end” from the list. Hit OK. Select the practice path and click the brush again. See how it looks.


STEP 20
Do the same for the other end of the path.

STEP 21
Now that we have a candy-like pattern brush, lets create the text. I used “Giddyup Std” font as reference. Grab the Horizontal Type Tool (T) and type the text below. Use multiple rows.

STEP 22
Select all text and go to Object > Expand, then go to Object > Path > Clean up.


STEP 23
In the Layers palette (F7), click the “Create New Layer” button and lock the layer below it. Select the newly created layer.

STEP 24
Grab the path tool and trace the text, but do not follow it entirely, feel free to connect words, add loops and cool knots. When you’re done tracing, select all these paths. Get creative!
NOTE: If you want to change colors, simply go to the shapes created, change their colors and create a new brush. My color choice was light gray with pink. The black background if for the pics to be more clear, adding this is not compulsory.

STEP 25
Go to Object Expand Appearance, then go to the Pathfinder window and hit “Merge”, then go to Object > Path > Clean up.


STEP 26
Open Photoshop and go to File > New to create a new document of 1600 x 2300 px in RGB color mode at 72 dpi.

STEP 27
Grab the Gradient Tool (G) and apply the gradient shown below to the background layer.


STEP 28
Click-drag the vector text from Illustrator to Photoshop resize it a bit and hit enter. Right-click near the layer thumb, select “Rasterize Layer”, then click the “fx” button and select Blending Options. Use the settings below.


STEP 29
Create a new layer (CTRL+SHIFT+N), set Blending mode to Multiply, grab the Brush Tool (B), set Hardness to 0% and remove any extra setting from the Brushes palette and paint some shadows to give it a more 3D look. Use a dark purple color.
Tip: CTRL+click the text layer and go to Layer > Layer Mask > Reveal All.

STEP 30
Create a new layer (CTRL+SHIFT+N) and place it below the text layer, grab the Brush Tool (B), set Hardness to 0% and remove any extra setting from the Brushes palette and paint some shadows, as if parts of the text bend away from the wall.

STEP 31
Open the “paper texture”. Select all (CTRL+A), copy it (CTRL+C) and paste it into our document (CTRL+V).Place the layer above the background layer. Resize it to fit the canvas and hit Enter. Set Blending mode to Multiply.

STEP 32
Go to Layer > New Fill Layer > Solid color… and Layer > New Adjustment Layer > Color Balance, Black & White. Use the settings below for each.


STEP 33
Select all artwork (CTRL+A, copy merged (CTRL+SHIFT+C) and paste it. Go to Filter > Sharpen > Unsharp Mask. Hit OK.

Done!

Download the source file from below and see it for yourself !

Great tut. Nice methods, although I think with a little more work you can keep it all in Illustrator.
You are right, i actually tried it. I used blending to create the shades (since i can’t apply gradients to brushes), then used the same technique to create the pattern brush.
I used Phantasm CS to give it the same pink tint and to be honest, it looks pretty cool. But the file is very large and if you use long paths, it will most likely crash your computer or make it run really slow.
I will write how i did this in vector if you are interested.
nice tuts.
Awesome outcome!
Love this.,,,
Great tutorial!! ..slightly difficult to follow at times, but I managed to reach the final outcome!! Thanks!! :D
Very good!
Awesome… Thanks so much .. highly appreciated.
thanks for this tutorial… just in time for some Christmas cards :)
In step 8, when I right click to Make Clipping Mask, all the red rectangles disappear… any idea why??
Yes. You need to bring the large grey rectangle to front. The clipping mask uses the top object to mask the objects below it.
Tell me if this helps.
I figured it out:
1st you need to copy and paste in front the gray rectangle then clear its fill.
2nd select all and make cliping mask
3rd Merge
good luck
Great article.. thanks for sharing!
Superb tutorial!!! Thanks for sharing!
Great tutorial, looks very in-depth and I can’t wait to try it.
Brilliant tutorial, I love the finished product… thanks for sharing!
why i can’t clean up the fonts, just expand the fonts onlt
Cleaning up is not really compulsory. All it does is erase any extra anchorpoints. The font is really clean and doesn’t really need that, but I’ve included it because it is a useful command to add in your work flow, especially, when you draw with a tablet.
I can’t fill the brush
When i select it, just fill the stroke
How to make it ?
Good Tutoriales con efectos!!
When I try to add the end, it says “The opperation cannot be completed because of an unknown error [112]”
Errors of this type usually appear when your RAM is loaded close to max capacity. Save what you’ve worked so far and restart Illustrator. To make it work better, close Illustrator when you use Photoshop (and the other way around).
The Illustrator’s RAM capacity is about 1.2Gb (for 2GB of installed RAM) and about 1.5 Gb for 3Gb installed RAM.
I hope this is helpful to you.
I have no other programs running when I was using illustrator. I will re try again though with your advice. Is there any way to check used ram when in illustrator to perhaps avoid exceeding the maximum capacity
Yes. You can see it in the Processes tab in the Task Manager in the Memory column. One of the designers here keeps it always in tray, just to know when to close any extra files, preventing any accidents and losing a few hours of work.
nice tutorial but one problem with step 24 i hope there are answer how create ? please step by step
Follow the (imaginary) center line of the letters with the Path Tool ,but with a single path. It’s a connect-the-dots game, it doesn’t have to be exactly like I did.
Thank you for this tutorial, Its very clear.
Wow! Very nice and easy… and believe me, if I could do it*, anyone can!
*My native language is Spanish and I have Photoshop and Illustrator in French, hehe…
Anything is possible if you have fun with it :D The first step is to like what you draw, the rest comes in naturally. Thanks for the feedback!
I want this in CSS now so bad!
Good Tuts!
Nice tutorial also featured on my website
:)
someone says what do in level 8? please
thanks!
download not working=(
more explanation step 24…..pleasee!!!!!
I’m confused on step 20, how exactly do I do create the other pattern brush with the other half of the circle?
thanks! buen tutorial!
Awesome tutorial!
My result wasn’t as good as yours though:(
My stripes are doing weird and I cannot download your example file.
It think it goes wrong when I make my striped brush.
Can you please help me?
Most likely, the stripes have an awkward trim and the red area is shifted. This happens because you haven’t trimmed it correctly. To fix it, you must start over. It becomes increasingly easier to create it the more you practice.
As for the download file, you have to be registered to download it.
this will sound really stupid, but i can’t find a place to register..:P
There was a register feature, but now it’s removed. You can download it freely now, without registering. Thanks for letting me know about this :)
You’re welcome. I really like your design, so Thank You for letting me download this.
1: little problem.
The download only included the .psd file, but not the .ai file.
My design stucks in the .ai file, when the stripes are made. I was hoping I could get your ai file, so I could check what I did wrong. (or have the good version anyway).
Thanks again.
(maybe you can mail me the .ai file to [email protected] ?)
I’ve made an .ai 10 file with the brush I used. Hope this helps you. http://bit.ly/GD2451
Thanks man! You’re the best:)
Tnx so much.
I want to ask about this part of tutorial, “Grab the path tool and trace the text, but do not follow it entirely, feel free to connect words, add loops and cool knots. When you’re done tracing, select all these paths. Get creative!”
What is the path tool ? i try to doing this with Adobe Illustrator cs 5.
thx for the reply
The Path Tool (P) is the 5th tool from the Tools bar. To toggle this bar, go to Window > Tools.
Now some info about the tool: It allows you to draw smooth curves with a minimum number of anchor points. Unlike the Brush tool, (which is a freehand type tool), you can control the curvature in any point by either click-dragging the segments between two anchor points or by selecting an anchor points with the Direct Selection Tool (A) and click-dragging the control grips.
It sounds complicated, but it’s all down to just “Hit P > Click-drag > Click-drag > Click-drag.”
Learned some really useful commands here (ctrl+D) as well as the overall project aim: creating a nice pattern brush, just thought I’d return the favour with a few points of my own:
1.) When creating a Clipping Mask you do not need to remove the fill. Simply put the mask object above all others, select all, and press CTRL-7.
2.) Use Smart Guides (CTRL-U) when duplicating the shape in step 16 so that you can grab it by an anchor point on a corner and SHIFT-ALT drag it until the smart guides intersects that corner with one on the original. In step 16 you would grab one of the left corners for this. Doing the reverse you would drag the opposite corners.
3.) You can also use smart guides to create the circles used in the endpoints, seeking out object centers and snapping the shape to the rectangle : )
good!
muitoh bom isso é demais.
Excellent tutorial, although I am having some troubles at the very beginning of it lol. I can’t seem to get the stripe pattern correctly… Is there another way of doing it other than the way you explained here? I’ve done other striped patterns before but they were pattern swatches, not pattern brushes.
I have a lot of experience and good handle of Illustrator, so I don’t understand what it is that I am doing wrong.
Thanks in advance :)
Think of it as a sinusoidal graph. You need to slice two different shapes in a way that when you put them next to each other, they form a seamless, continuous shape (in this case, the oblique red stripes). So when you erase a piece from one stripe, the next one should contain the erased part from the previous slice.
Thanks for writing such a great and easy to follow tutorial!
My result is here http://littlesparklylamb.blogspot.co.uk/2012/08/summertime.html.
I linked it back to your tutorial!
You’re welcome :) Glad you liked it.
Love the tut so far. It's good to get out of the rut and try new stuff. I do need some help.
I am making the end start and have it saved in the swatches. When I go to the brushes and try to load it I get the 112 error. I don't usually get memory errors even when I have EVERY thing open. I did shut down my machine and reload the file and still getting the error.
I figured it out. When I made the start piece I didn't merge it. I must have create an image too big. After I merge/expanded the appearance it worked as expected. Hope this helps the previous post with this problem.
Hopefully I'll complete the tut today. Can't wait.
I appreciate it.thanks.
Thanks for writing such a great and easy to follow tutorial!
Great detailed tutorial and screenshots. Thanks for the inspiration!
it is a great tutorial thanks man really loved it
I got to step24 but when I don’t know what the path tracer tool is. I have cs6 and i tried using the pen tool but my corners are terrible. It keeps stopping every time i make a corner. I don’t know what I’m doing wrong but my tracing looks so choppy and not smooth at all. Please help me. :(
The Path Tool (P) allows you to draw a spine to apply the brush to. It works like this: Start with a click, then click-drag to create a round corner. If you only click, it will create a “corner” point, with no handles to control the curve.
If you want to convert an anchorpoint to “corner” or “smooth”, use the Direct Selection Tool (A): select the anchorpoint (it will look like a filled small square), then click the “convert to smooth” button – it’s in the top left corner, right below the menu. Can’t miss it. Tell me if this helps.
I can’t understand in step 9. please help me
The first red stripe must overlap the second red stripe. This helps you make the pattern brush look seamless.
i’ve still confused about this command “Move the copied shape to the right until the first red stripe aligns with the second stripe from the shape below it. Reduce Opacity to see it better. Now select the shape above and set its Fill color to black” and can’t continued to next step .
sorry if you confused about what i mind because i can’t speak english very well hehe
perhaps this is helpful? – http://bit.ly/14VzdnT
Heya i am for the primary time here. I found this board and I to find It really useful & it helped me out a lot.
I hope to present one thing again and aid others like
you aided me.
Very Nice Graphic Design
hello,
I have a small problem in step 12, the brush tip option is not visible. What is the error?
THK’s
oh it’s ok!! sorry
Thanks it’s a very detailed, nice subject and beautiful art
anyone seen this tutorial video lesson? ‘m from Brazil and to accompany this tutorial in English even translated by google’s not, please if anyone has a link to video I would be very grateful
Hi there! Loving this tutorial, so far the results are awesome! However, I’ve gotten as far as creating my first pattern brush, and then creating the rounded end. However, at Step 19, my “candy end” brush isn’t in the list. I only have None, Original, Foliage & Pompadour. Using Illustrator CS6 – can anyone help me?
Where can i download the illustrator file?
How can i develop my photoshop skill?
Awesome! You’re so good!