How to Create a Mad Chihuahua Wallpaper in Photoshop
In this tutorial we will create a grungy abstract wallpaper using vectors, powerful lighting and stock brushes. You can use these techniques to enhance your own photos, all you need is some patience and preferably a graphic tablet.
Along with creating this, you will learn how to:
– create textured backgrounds from simple photos
– create strong light rays
– enhance an element using basic brushing techniques
– increase the clarity of an image
– create focus for areas of interest
Difficulty: Intermediate
Completion time: 2 hours
Tools: Photoshop CS3, Illustrator CS3 (Optional)
Resources:
– Dogs Vector Pack from designious.com
– forest from T3hSpoon
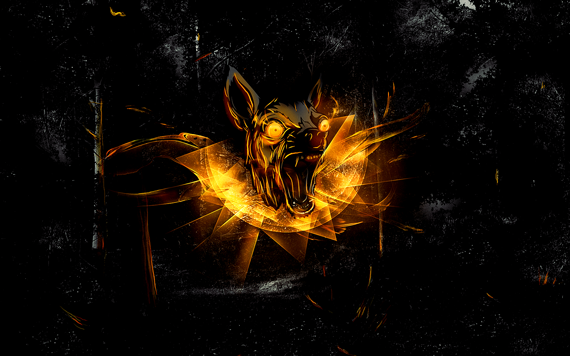
Final image preview

STEP 1
Create a new document with the size equal to your screen’s resolution at 72 dpi and in RGB color mode. My screen size is 1680×1050 px (widescreen).

STEP 2
Open the “forest” image by simply click-dragging it into Photoshop. Select all (CTRL+A), copy it (CTRL+C) and paste it (CTRL+V) into our drawing.

STEP 3
Go to Edit > Free Transform (CTRL+T) and click-drag one of the corners to make it smaller. Make it fit the entire document, but leave out the black edges. Hit Enter. There’s no need to preserve proportions.

STEP 4
Go to Image > Adjustments > Desaturate (CTRL+SHIFT+U). Then go to Image > Adjustments > Levels. Use the settings below or similar.

STEP 5
Go to Layer > New > Layer (CTRL+SHIFT+N) to create a new layer. Go to Window > Clone Source and grab the Clone Stamp Tool (S). Set the brush to about 230 px, Hardness to 0%, Opacity 100% and Sample to “All Layers”.

STEP 6
Hold the ALT key and click the are shown below, where there is a light gray spot. In the Clone Source window, set Angle to a random value, below 90 degrees. Now start clicking random areas in the middle and lower areas of the image.
We want to break the perspective view of the landscape by adding more leaves. This will also create a nice texture.

STEP 7
Repeat the previous step, but pick different source areas (ALT+click) and change the Angle setting randomly.

STEP 8
Open the “Dogs Vector Pack”. If you have Illustrator installed, you can just click-drag the chihuahua head into our Photoshop document. If not, you can open it in Photoshop and copy it using the Lasso Tool (L).

STEP 9
Resize it, place it in the center and hit Enter. Open the Layers palette (F7) and right-click the curent layer’s thumbnail and select Rasterize Layer. This is necessary only if you place it as Vector Smart Object.
STEP 10
Go to Image > Adjustments > Desaturate (CTRL+D). Then go to Image > Adjustments > Curves and adjust the curve like below or similar. Hit CTRL+U to open Hue/Saturation and set Lightness to -43. hit OK.


STEP 11
Go to Layer > New > Layer (CTRL+SHIFT+N) and name it “flames”. Grab the Brush Tool (B), hit F5 to bring up the Brushes palette and use the following settings.

STEP 12
Set Foreground color to a bright light orange (I’m not going to give you the color codes, I want to tap into your creativity) and paint strokes on the dog’s hair, like there would be a fire on his right side.

STEP 13
Create another layer (CTRL+SHIFT+N) and name it “light-flames”. Set the Foreground color to a bright yellow and paint over the strokes created in STEP 12, but do not cover them completely.

STEP 14
Create a new layer (CTRL+SHIFT+N) name it “flames-flare” and click-drag it below the “flames” layer. Grab the Brush Tool (B), hit “3” to set Opacity to 30%, increase the brush size and paint some light orange and yellow strokes on the chihuahua head.

STEP 15
Select all layers above the chihuahua and hit CTRL+G to place them in a layer group. Double-click its tag and rename it to “dog”.

STEP 16
Expand the “background” layer group, select one of the layers in it, hit D, select the Brush Tool (B), set it to about 230 px, create a new layer (CTRL+SHIFT+N), place it below the dog layer and create a dark spot behind the dog. This will cover the texture, making it stand out more.

STEP 17
Select the “dog” layer group, expand it and create a new layer inside it (CTRL+SHIFT+N). Place it above all other layers in the group. Now grab the Brush Tool (B), hit “3” to set its Opacity to 30%, select a light yellow color and paint over the dog’s eyes.

STEP 18
Repeat STEP 17, but use a light orange and paint in the lower area of the eye. Also add some dark orange strokes and white ones.

STEP 19
Collapse the layer group. Go to the Layers palette (F7) and click the “folder” icon. Name this layer group “lights”. Then go to Layer > New > Layer (CTRL+SHIFT+N).

STEP 20
Grab the Polygonal Lasoo Tool (L) and draw a triangular shape. Make it similar to mine. Then grab the Paint Bucket Tool (G) and fill the selection with a bright orange color.

STEP 21
Go to Select > Modify > Contract. Set it to 2 px and hit OK. Grab the Eraser Tool (E), hit “4”, set Hardness to 0% and erase the interior, like below. Then go to Select > Deselect.

STEP 22
With the Eraser Tool still selected, erase the corners of the triangle.

STEP 23
Repeat STEPS 20-23 to create multiple lights.

STEP 24
Create a new layer (CTRL+SHIFT+N), grab the Elliptical Marquee Tool (M), hold ALT+SHIFT keys and click-drag a circle like below. Then grab the Paint Bucket Tool (G), hit D, then X and fill the selection.

STEP 25
Repeat STEPS 21-24 to create multiple circles with the same fade effect, then set their Blending Modes to Overlay. Also select all the rays layers created, go to Layer > Merge Layers, hit CTRL+J to duplicate it and set Blending Mode to “Screen”.


STEP 26
Create a new layer (CTRL+SHIFT+N) and place it below any other layers in the group. Now grab the Brush Tool (B), ALT+click on an orange color, increase the brush size to about 250 px, set Opacity to 30% and paint a subtle glow for the lights.

STEP 27
Grab the Burn Tool (O), set it to midtones and 37% Exposure and darken the extremities and a few areas of the orange lights. Use the Selection Tool (V) with the “Auto Select” option to quickly switch layers.

STEP 28
Grab the Dodge Tool (O) – SHIFT+O to switch to it, set it to Highlights with a 18% Exposure and brighten the middle areas of the lights.

STEP 29
Create a new layer (CTRL+SHIFT+N), grab the Brush Tool (B), set Hardness to 0%, Opacity to 20% and paint some environmental lights on the trees from the background. Use bright orange and yellow colors.

STEP 30
Open the Paint brush pack from designious.com. Paste one of the shapes into our document. Right-click on its layer thumbnail and select “Rasterize Layer”. CTRL+click its layer thumbnail and go to Edit > Define Brush Preset.

STEP 31
Grab the Brush Tool (B), select a bright orange color, select the brush you just created and create a simple, straight stroke. Make sure the Spacing setting in the Brushes palette (F5) is 1%.

STEP 32
Go to Filter > Liquify (CTRL+SHIFT+X). Now click-drag and make the shape more fluid. Hit OK.
CTRL+click the layer thumb, go to Select > Modify > Contract, grab the Eraser Tool (E) and clean up some areas, to make it look like wild fire.

STEP 33
Add more brush strokes for an increased effect.

STEP 34
Select the top-most layer group and go to Layer > New Adjustment Layer > Brightness / Contrast. Use the settings below. Do the same for the other adjustment layers: Exposure and Levels.


STEP 35
Select the entire artwork (CTRL+A), copy merged (CTRL+SHIFT+C) and paste it. Go to Filter > Sharpen > Sharpen.

Done!

The source file along with some wallpaper presets are available for download in the link below. So.. Download!
[download id=”167″]
awesome! excellent post & thanks for sharing :)
Awesome tutorials and hard working .
wow! amazing! thanks)))
Absolutely brilliant. Thanks for the tutorial. I will be trying it out over the next few days… I am inspired.
you are right! i agree with you
Thanks
expertclipping.com
i must confess you, this is one of the best sites i ever seen in my life..seriously….in a couple hours i’ll be back to show u kids the result…
i feel a little frighten,but the effect is good
Brilliant effect, Step by step explanation is perfect and good flow too. Thanks for sharing
….what a frightening end result! …
Its a great tutorial to make a Chihuahua Wallpaper in Photoshop. Thanks for sharing.
wow great tutorials. I think it is very difficult.
thanks for sharing It.
Wow! Fantastic art and thanks for your good mind.
Wow very nice tutorial about making this kind of graphic design. Very professional hand work for it, this is really clear. Every section in here showed in a very clear way, which is very understandable. Making this type of graphic is a difficult task, but images in here made it so easy to understand. Actually this really nice presentation, and lots of learning material added here. This tutorial is enough for this kind of design, who don’t find this type of tutorial on youtube, this might be helpful for them. Very remarkable shot, thanks a lot for sharing nice excellency.
Very proper execution. A source of adequate information about Graphic work in Photoshop. I am just loving it.
Excellent tutorial about how to create a mad chihuahua wallpaper in photoshop. This blog huge information share. I am very helpful for your effective tutorial. I also bookmarking this blog.
Reakky an awesome Tutorial – a big “thank you”. Hope you continue posting on this topic. Waiting for your another post.
nice photoshop.
Great tutorial and very easy to follow. I really like how you achieved the end result without a lot of effort. Thanks for sharing.
I am photo editor and graphic designer since 2007. I made many effects in photoshop but never made similar effect.
Its amazingly realistic looks. I really appreciate your work.
Best,
John.