Drawing vector portraits Part 2: The eyes
In the previous post, I’ve showed how you can prepare a sketch for the facial proportions and what things you need to do in order to get things right. In this article I will explain how to properly draw the human eye based on anatomy.
We will discuss all details based on this pencil sketches I made.

First, you’ll have to keep in mind that the eye isn’t just an entity, it is composed of multiple shapes with different shapes positioned adjacent to one another. Like in the first part, placing them is crucial to a nice aspect and credibility. Remember that if you don’t want to draw an incredibly realistic eye, at least you have to make your audience that you’ve drawn an eye.
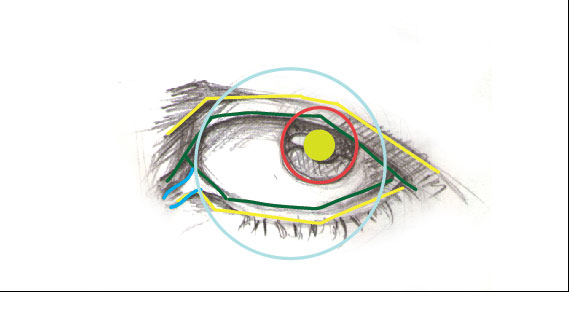
Here’s a basic sketch-up of the eye. Start shaping it along these rough lines. Also observe proportions between eyelids and eyeball, eyeball, iris, angles and the positioning of the tearduct.
The eyeball
Let’s start with the eyeball and shape up the rest around it. It shaped like a sphere and it will have its own shading, namely the one from the top eyelid. So start drawing the full eyeball without considering any other element.
Look at the sketch below and try to understand the shape of the eye on the “outsideâ€. This will give you an idea of how to sketch the eyelids. Starting from the closest part to the nose, you’ll draw a wide-arcing curve that extends towards the corner. The bottom eyelid has a more smooth curve and shares one of its contour lines with the eyeball’s.

Remember to sketch the tearduct and the small extension between it and the top eyelid. There are artists who don’t draw it at all or just sketch it a bit, but your audience will appreciate it of you do put a bit of details into it.
The iris
Now for the iris. It is rounded and it should be drawn that way, just like the eyeball. Draw it entirely and erase the unwanted part later.
The iris is e hidden about 30-35% behind the top eyelid and the pupil is concentric with the iris. Don’t place it right in the middle or your subject will look scared or as if he has been drinking ten coffee mugs.

It has 3 basic elements you should keep in mind: contour, glow (the eyeball is wet and smooth) and shade.
The contour should be thick, to make it stand out. Since it’s behind the top eyelid, it has a small shading. When you place the glow, you must do it as if you’d place it on the eyeball. The rest of the iris must have the actual eye color with small lines to suggest the muscles that expand and contract the pupil.

The eyelids
Now let’s start shaping up the eyelids. Add a smoother shape to the top eyelid and draw the second line where the skin curls up to give it a bit of volume. Further sketch the shadow it drops on the eyeball. Remember to draw the top eyelid with a thicker line. This will give to your eye more perspective.


For the bottom eyelid, the inner contour starts from the eyeball’s outline, comes in a smooth curve and ends on the opposite side of the eyeball. The line-style should be: thick-thin-thick to suggest the idea that it goes through lighting transitions.
When the eye is open, you can see the thickness of the bottom eyelid. Let’s draw that. The exterior line starts from the tearduct and follows a parallel path with the inner one. I’ve marked the bottom eyelid and the gap between the top eyelid and the tearduct. Some artists make the mistake of leaving that part out, but if you do draw it, the eye will have more volume and will have more credibility.

Shading
As I stated in the beginning, it’s important to understand the shape of the eye in order to add shading and lighting after you’ve established your light source. I’ve made a simplified version for you to understand better how you should properly do the shading.

Here’s the basic vector shading of what we’ve done so far. I didn’t add too many details yet so you’ll get an even better comprehension of how the final portrait will look like.

The source file for this tutorial is available in the link below.
[download id=”148″]
Was this article useful to you? Share your thoughts!
Nothing is better than having a quality post with lots of ideas Really cool stuff and very inspiring. Thanks for sharing!so beatiful collections
You’ve made a complex process seem so easy and simple! thanks
Really nice tips, thanks so much.
Great information! I’ve been looking for something like this for a while now. Thanks!
O boy..a real piece of work..love the output ..
Really nice tips, thanks so much.
i am rakshika.pls give me some tips that how to draw a natural scenary as it is only by pencil.