How to Create a Conceptual Headdress in Photoshop
Today we will create a really cool conceptual headdress using stock photos, Photoshop and our imagination. The idea hit me when I saw a picture of a native American while browsing around some pictures. So I thought it would be interesting to make one with a totally different twist, with bone and metal.
Difficulty: Intermediate
Completion time: 1-2 hours
Tools: Photoshop CS3
Resources:
– girl by reine-haru
– skull 1 by lumix2004
– skull 2 by mkroot
– dragonfly by bradimarte
– train by wetape
– compass by aldoaldoz
– corkscrew by buri-osiol
– motorcycle by mzacha
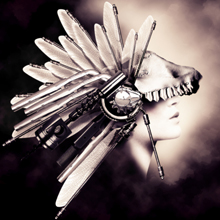
Final Image Preview Of the Conceptual Headdress

STEP 1
Create a new document of 2300 x 2600 px in RGB color mode and the “Background” setting set to “Transparent”. Name the document “concept-headdress” and save it (CTRL+S).

STEP 2
Open the “girl” picture. Select it (CTRL+A), copy it (CTRL+C), go to Window > concept-headdress.psd (our document) and paste it (CTRL+V). Name this layer to “girl”.

STEP 3
Go to Edit > Free Transform (CTRL+T), hold the SHIFT key and click-drag one of the corners to make it a bit smaller, as shown below. Hit Enter.

STEP 4
Open the “skull 1” picture. In the Layers palette (F7), double-click the lock and hit OK. Now grab the Quick Selection Tool (W) and click-drag on the blue areas and the pillar. This will load a basic quick selection.

STEP 5
Hit Q to enter Quick Mask mode, grab the Brush Tool (B), set it to a hard, round brush and paint over the areas of the skull not yet covered with red. The red tint is only a mark, don’t try to use actual red to paint over.

STEP 6
Hit Q again to exit Quick Mask mode and hit Delete. Go to Select > Deselect (CTRL+D). Select all artwork (CTRL+A), copy it (CTRL+C), go back to our document (Window > concept-headdress.psd) and paste it (CTRL+V).

STEP 7
Hit CTRL+T (Free Transform mode), resize it and place it like below. Hit Enter. Name this layer “skull 1”. Do the same for the “skull 2” picture, but name the layer to “skull 2”.


STEP 8
Open the “train” picture. Select the entire picture (CTRL+A), copy it and paste it into our document. Hit CTRL+T, resize it and place it like below. Go to Layer > Layer Mask > Reveal All.
Grab the Brush Tool (B) and paint over the area shown below.


STEP 9
Select the “Skull 1” layer and repeat STEP 8 for the area shown below.


STEP 10
Repeat STEP 9 for the “skull 2” layer.
How to Create a Conceptual Headdress in Photoshop Step

STEP 11
Go back to the “train” picture, grab the Path Tool (P), set it on Paths and trace the bar shown below. Close the path and right-click > Make Selection. Copy it, go back to our document and paste it. Name this layer “iron bar”.

I’ve extended one of the bars because I want more weight in the back of her head. Here’s how to do this.


STEP 12
Go to Layer > Duplicate Layer (CTRL+J). Hit CTRL+T, resize it and place it like below. Duplicate it again (CTRL+J) and place the copy as shown.

STEP 13
Go to Image > Adjustments > Levels (CTRL+L). Use the settings below. Duplicate it again. Do this for all bars.

You’re wondering why I didn’t place this step earlier, so you can avoid extra work? Well, I wanted to re-create the actual work flow, not the optimal route to the final product. It’s irrational to create the tones before the placement of the elements in the composition.
STEP 14
Open the “dragonfly” picture. Now grab the Path Tool (P), set it on Paths and trace the contour of a dragonfly wing. Close the path and right-click > Make Selection. Copy it and paste it into our document.

STEP 15
Name this layer “wing”. Hit CTRL+T to enter Free Transform mode, resize it, rotate it and place it like below. Duplicate it multiple times (CTRL+D) and place them as below.


STEP 16
Hold the CTRL key and click every “wing copy” and “iron bar copy” layer tag and hit CTRL+G to place them in a layer group. Name this group “wings” and right-click > Duplicate Group.

STEP 17
Hit CTRL+T, make it smaller and place it like below. Hit Enter to exit Free Transform mode.

Now the design is starting to be a bit too complex and the colors from the original pics might have an influence on your final design, misleading you. So here’s a neat trick!
STEP 18
Select the top-most layer and go to Layer > New Adjustment Layer > Black & White. Use the default settings and hit OK. Click the lock in the Layers palette (F7) to make it un-editable (for now!).

STEP 19
Grab the Move Tool (V) and CTRL+click the girl, directly on the canvas. This will set the “girl” layer as the current layer. Create a new layer (Layer > New > Layer) and set its Blending mode to “Multiply”. Name this layer “shadows on girl”.

STEP 20
ALT+click between these layers to create a clipping mask. Now grab the Brush Tool (B), set it to a soft, round brush and a dark gray, then paint some shadows in the areas shown below.

STEP 21
Open the “corkscrew” picture. Grab the Quick Selection Tool (W), click-drag in the white area until you get an outer selection. Hold the SHIFT key and click-drag in the inner white areas.

STEP 22
Double-click the lock near the layer thumb and hit OK. Hit Delete and go to Select > Deselect.
Select all (CTRL+A), copy it and paste it into our drawing. Hit CTRL+T, resize it and place it like below.


STEP 23
Go to Layer > Layer Mask > Reveal All. Grab the Brush Tool (B), set it to a hard, round brush and paint over the areas shown below (the layer mask is selected!).


STEP 24
Open the “piston” picture. Grab the Path Tool (P), trace it and right-click > Make Selection. Copy it, paste it into our document and place it as shown below. Hit CTRL+L and use the settings below.

STEP 25
Select the “corkscrew” layer mask and paint over the cylindrical area of the piston. Then open the “compass” picture, cut out the shape shown below and paste it into our document. Hit CTRL+SHIFT+U to desaturate it. Use the Levels setting from STEP 24 or similar to bring it to the same tonal value.

STEP 26
Open the “motorcycle” picture. Grab the Path Tool (P) and trace an exhaust pipe. Copy it, paste it into our document and place it like below.

STEP 27
Duplicate it multiple times and place the copies like below (CTRL+J).

STEP 28
Select the “Black & White” adjustment layer and unlock it. Set the the layer’s Opacity to 50%.

STEP 29
Create a new layer (Layer > New > Layer) and place it below any other layer (CTRL+SHIFT+[).
Grab the Paint Bucket Tool (G) and fill the layer with black. Set the “background color to a midtone orange and go to Filter > Render > Clouds.

STEP 30
Open the “History” window (Window > History). Click the “Create New Snapshot” button and select it. Now grab the Art History Brush Tool (Y), grab a nice grungy brush and draw short strokes on this layer (created in STEP 29).

STEP 31
Create a new layer (CTRL+SHIFT+N). Now grab the Brush Tool (B), set it to an oval, hard brush with about 40% Opacity and paint a feint light spot, as below. Draw a smaller one over it, then another smaller than the last.

STEP 32
Go to Filter > Blur > Gaussian Blur. Use a setting of 7.5 px and Hit OK.

STEP 33
In the Layers palette (F7), select the “wings” layer group and go to Layer > Merge Layers (CTRL+E). Create a new layer (Layer > New > Layer or CTRL+SHIFT+N) and set its Blending mode to Multiply.

I’ve decided I should mask out the body of the girl, leaving only the head. Add a layer mask and simply paint over the unwanted areas, like you did with the skulls.
STEP 34
ALT+click between these layers to create a clipping mask. Grab the Brush Tool (B), set Opacity to about 40% and draw shadows in the areas below.


STEP 35
Select the Black & White adjustment layer and go to Layer > New Adjustment Layer > Gradient Map. Use the settings shown below and hit OK. Set the Blending mode to “Soft Light”.


STEP 36
The background looks a bit “flat”, let’s fix that with a vignette effect! Select the bottom-most layer. Now grab the Burn Tool (O), set it on Shadows at 30% Exposure and paint over the corners of the background.

STEP 37
Select the “gradient map” layer, select all artwork (CTRL+A or Select > All), copy merged (CTRL+SHIFT+C) and paste it (CTRL+V).

STEP 38
Duplicate this layer (CTRL+J), go to Image > Adjustments > Desaturate (CTRL+SHIFT+U) and set Blending mode to “Screen” and Opacity to 95%.

STEP 39
Duplicate the original again, hit CTRL+SHIFT+] to place it on top of all layers and go to Filter > Other > High Pass. Use a 1 px setting, hit OK and set the layer’s Blending mode to Overlay.

Done!


this cool,like indians
this is really helpful for learning.
than you every one who made this
very very cool!!! thank you.