How to create a Fantastic Grayscale Wallpaper in Photoshop
Today, we will create a nice wallpaper using stock vectors, images and a bit of imagination. Along, we will also learn some photo retouching techniques, enhancement and changing the lighting source.
Difficulty: Beginner – Intermediate
Completion time: 1-2 hours
Tools: Photoshop CS3, Illustrator CS3
Resources:
– Wall texture
– Frame
– Damask pattern
– Lamp
– Light Switch

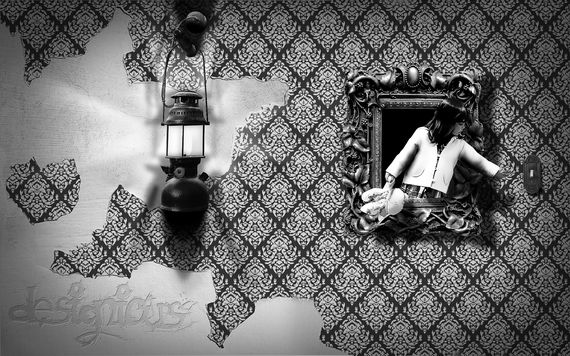
What you’ll be creating
Setting up the scenario
STEP 1
Go to File > New… and create a document of 1680×1050 px at 72 dpi in RGB color mode.

STEP 2
Open the “wall texture†(File > Open… or CTRL+O) select all (CTRL+A), copy it (CTRL+C) and paste it into our document (CTRL+V).

STEP 3
Go to Image > Adjustments > Desaturate (CTRL+SHIFT+U). Then go to Layer > Duplicate Layer (CTRL+J).

STEP 4
With the top-most layer selected, go to the Layers palette (Window > Layers or F7) and set its Blending mode to Hard Light. This will enhance a bit the shadows and lighten the highlights and midtones.

STEP 5
Select these two layers (hold SHIFT key and click their thumbnails in the Layers palette) and go to Layer > Merge Layers (CTRL+E). Then duplicate it again like in STEP 4 (CTRL+J).

STEP 6
Go to Edit > Free Transform (CTRL+T) to enter transform mode. Then right-click > Flip Horizontal. Move them around till you obtain some nice areas with torn cement. Feel free to add more duplicates. Doesn’t have to look great for the moment.

STEP 7
Grab the Pen Tool (P), set it on Shapes and roughly trace the areas Where the wall has torn pieces. No need to be precise, it will look better if you get a bit sloppy.

STEP 8
Create a layer above all layers (Layer > New > Layer or CTRL+SHIFT+N). Grab the Paint Bucket Tool (G) and fill it with a color of your choosing (any color will do, it won’t show anyway.

STEP 9
Open the “damask pattern†in Illustrator. Select one of the patterns and make it larger (Grab the Selection Tool, hold SHIFT key and click-drag one of the corners of the pattern).

STEP 10
Go back to Photoshop and create a document of 400×400 px. Then click-drag from Illustrator the pattern into the Photoshop document.


STEP 11
In the Layers palette (F7), CTRL+click the layer’s thumbnail to load a selection of the contour. Then go to Image > Crop. Go to Select > Deselect (CTRL+D). To make a pattern out of it, go to Edit > Define Pattern (CTRL+F2) and hit OK in the popup window.

STEP 12
Go to back to our document. Select the top-most layer and click the “fx†button in the Layers palette (F7). Select “Blending Optionsâ€. Check “Pattern Overlayâ€, click it and set the pattern to the one we created in STEP 11. Set Scale to about 85%. Hit OK.

STEP 13
In the Layers palette (F7), CTRL+click the “shape 1†thumbnail , then CTRL+SHIFT+click the “shape 2†(or as many as you created) thumbnail to load a selection of the layers. Then select the top-most layer and click the “Add Layer Mask†button in the Layers palette (F7).

STEP 14
Grab the Brush Tool (B), select the layer mask, set foreground color to pure white (#000000) – hit D, then X (this will reset the foreground-background colors to black and white and switch them), then paint over the shown area. This will reveal the pattern below the mask. Select all layers from the Layers palette (F7) and hit CTRL+G. Rename it “backgroundâ€.


STEP 15
Open the “lamp†image (File > Open… or CTRL+O). Grab the Pen Tool (P), set it on Paths and carefully trace the contour of the lamp. Once you traced it, right-click > Make Selection and copy it (CTRL+C).


STEP 16
Paste it into our document (CTRL+V). Repeat the contour tracing until you clean up the entire lamp. Simply hit Delete when you load the selection from tracing.

STEP 17
Once you’re done cleaning it up, go to Layer > Duplicate Layer (CTRL+J), then go to Filter > Other > High Pass. Set it to 1.1 px and hit OK. Go to Layers palette (F7) and set Blending mode to Overlay.
This will sharpen the texture a bit.

STEP 18
Select both layers (SHIFT+click) and go to Layer > Merge Layers (CTRL+E). Now open the “frame†picture. Grab the Pen Tool (P), set it on Paths and trace the frame like in STEP 15.

STEP 19
When you’re done, copy it (CTRL+C) and paste it (CTRL+V) in our document. Feel free to resize it a bit. Also repeat STEP 17 to sharpen the texture. Grab the Paint Bucket Tool (G) and fill the interior of the frame with black.

STEP 20
Open the “girl†photo (CTRL+O). Go to Filter > Blur > Surface Blur and adjust it till the wall and the girl’s shadow look clean.

STEP 21
Grab the Pen Tool (P), set it on Paths and carefully trace the girl’s contour. When you’re done, hit right-click > Make Selection. Copy it (CTRL+C) and paste it in our drawing (CTRL+V).

STEP 22
Go to Edit > Free Transform (CTRL+T) and rotate the image a bit, like the girl would try to reach something. Then go to Layer > Layer Mask > Reveal all.

STEP 23
Fron the Layers palette (F7), CTRL+click the layer below your current layer (the one with the frame). Grab the Brush Tool (B), hit D to set foreground to pure black, select the mask and paint the girl’s skirt that overlaps the frame. Make sure the teddy-bear comes over the frame.

STEP 24
When you’re done masking, go to Select > Deselect (CTRL+D).
STEP 25
Do the same for the “light switch†picture (STEP 21).

Creating the lights and shades
Now that we have a scenario, we need to also make it believable. We will recreate the lights and shadows on each element.
Here’s the basic setup:

STEP 26
Let’s start with the lamp. Select the layer with the lamp, go to Layers palette (F7) and click the “New layer group†button. Name it “lampâ€. Then click-drag the layer into the layer group.

STEP 27
Grab the Pen Tool (P), set it on Shapes and draw a shape like below. Make it a dark gray color. Don’t use pure black, else it will look stiff and really dark.

STEP 28
Right-click on the layer in the Layers palette (F7), select Rasterize layer and set Blending mode to Multiply and Opacity to about 70%. Place this layer below the layer lamp layer.

STEP 29
Go to Filter > Blur > Gaussian Blur and set it to 6-6.5 px. Hit OK.

STEP 30
Repeat STEPS 27-29, but set Opacity to about 65% and place it below the first shape.

STEP 31
Select the second shape layer and go to Layer > Layer Mask > Reveal All. Grab the Gradient Tool (G) and SHIFT+click-drag like below. This will make the shadow more subtle.

STEP 32
Repeat STEPS 27-29 and 31 for the shapes shown below. Feel free to adjust Opacity as you see fit.

STEP 33
With the Pen Tool (P) selected and set on Shapes, draw a shape like below. Rasterize it, then CTRL+click the thumbnail in the Layers palette (F7).

STEP 34
Grab the Gradient Tool (G), set it to white to midtone gray in Radial mode. Then click-drag from the center of the shape to one of the corners. Then go to Select > Deselect (CTRL+D).

STEP 35
Go to Filter > Blur > Gaussian Blur. Set it to about 12 px. Hit OK. This will be our flare of the light source. Place this layer below the lamp layer.

STEP 36
Select all the “Shape†layers besides the last one and hit CTRL+G to place them in a layer group. Double-click its name and rename it to “shadowsâ€.

STEP 37
Create a new layer group above the “shadows†layer group (click the folder-looking icon in the Layers palette) and name it “Lightsâ€.

STEP 38
Grab the Ellipse Tool (U) and create a small oval like below. In the Layers palette, click the “fx†button and select Blending options. Check the “Drop shadow†and “Color Overlay†boxes. Use the settings below or similar.


STEP 39
Grab the Pen Tool (P) and create a shape like mine. Rasterize it, then CTRL+click its layer thumbnail. Grab the Gradient Tool (G), set it to white to midtone gray in Radial mode (like in STEP 34).

STEP 40
Set Blending mode to Linear Dodge (Add). Grab the Brush Tool (B), Go to Layer > Layer Mask > Reveal All, press D to set foreground color to pure black and paint over the areas shown below.


STEP 41
Repeat STEPS 39-40 to create the lights shown below.

STEP 42
Select all these layers and press CTRL+G to group them. Name this layer group “lightsâ€.
I’ve seen a lot of people ignoring the layer groups, so I insist using them. If you’ve already grouped them, skip this step.
STEP 43
In the Layers palette (F7), select the “lamp†layer and duplicate it. Select the original layer and go to Image > Adjustments > Hue/Saturation and set Lightness to -100 (minimum). Hit OK.

STEP 44
Go to Filter > Blur > Gaussian Blur and set it to about 7 px. Hit OK. Set Blending mode to Multiply and Opacity to 50% or somewhere around this value.

STEP 45
Go to Edit > Free Transform (CTRL+T), click-drag one of the grip points from sides and hold ALT key. Distort it a bit and hit Enter.

STEP 46
Select the “lamp copy†layer, grab the Dodge Tool (O), set it to Midtones with 17% Exposure and paint over the areas shown below. Then switch to Shadows, with 6% Exposure and paint over the areas shown in the image below.

STEP 47
Grab the Burn Tool (O) and darken the wall hanger.

STEP 48
Select the “frame†layer and go to Image > Adjustments > Levels (CTRL+L). Darken the Shadows a bit and lighten the Highlights – play around with the cursors till you get a result you like.

STEP 49
Create a new layer group, name it “frame†and place the “frame†layer in it. Create a new layer above it, grab the Brush Tool (B), set it to soft round, hit D to set foreground color to pure black and paint over the areas on the frame where you need more shading.
This is relies more on your perception over the light, so results should vary, but not too much.

STEP 50
Now for other objects that affect the shadow on the frame – the girl.
Paint over the shadow that the girl drops. Try doing something similar to mine.

STEP 51
Select the “frame†layer and go to Layer > Duplicate Layer (CTRL+J) to duplicate it. Select the original layer, go to Image > Adjustments > Hue/Saturation (CTRL+U) and set Lightness to -100. Hit OK.

STEP 52
Go to Edit > Free Transform (CTRL+T). Hold CTRL and click-drag the top and bottom right corners. Distort it like below and hit Enter. Go to Filter > Blur > Gaussian Blur and set it to 7 px.

STEP 53
Set Blending mode to Multiply and Opacity to 85%.

STEP 54
Repeat STEPS 49-53 for the “light switchâ€.

STEP 55
Now we need some retouching on the girl. Select the “girl†layer, create a new layer group, name it “girl†and place the layer in the group. Then expand the group.

STEP 56
Create a layer above the “girl†layer (CTRL+SHIFT+N) and ALT+click between the layers. Grab the Brush Tool (B), set foreground color to white, press “6†to set its Opacity to 60% and paint over the highlights of the hair to enhance them a bit.
Feel free to vary the brush size (press “[“ and “]â€) for a more smooth effect.

STEP 57
Select the “girl†layer, grab the Burn Tool (O), hit “3†to set Exposure to 30%, set it to Midtones and darken the shadows on the girl.

STEP 58
Go to Image > Adjustments > Levels (CTRL+L) and use settings similar to mine.

STEP 59
Create a new layer above all layers and set Blending mode to Multiply. Grab the Brush Tool (B), press D to set foreground color to pure black, set Hardness to 0% and paint over the edges of the canvas. Place it above the “background†layer group.

STEP 60
Grab the Horizontal Type Tool (T), click drag somewhere on the canvas where there’s a concrete texture and type a text of your choosing. Set Font to “Scratch_1†and size of your choosing. Set Fill to 27%.

STEP 61
Open the Blending options from the “fx†button in the Layers palette and use the settings below.

STEP 62
Go back to the “concrete texture†document, copy it and paste it into our document. Place it over our text and ALT+click between the two layers.

STEP 63
Go to Layer > New Adjustment Layer > Hue/Saturation and set Saturation to minimum (the image will turn to black and white.

Done!
Download the .PSD file for this tutorial from the link below!
[download id=”160″]
Note: The scratchy text is completely editable, so feel free to add your own text!
I should say it wala..really the design work u did is appreciable …thanks man…thanks for sharing ..
Nice Tutorial, The shadow effect with the light is really good.
This is a brilliant and educating tutorial here!
Interesting and cool idea. Altrough it looks a bit retro.
Thanks for the tutorial!
Really fantastic Grayscale Wallpaper. Thank you for sharing.
Thanks!!! Your steps are easy to follow!
C”,)
Amazing wallpaper.Thanks for sharing
Awesome tutorial! Thanks!
This tutorial is amazing. Photoshop can be so overwhelming. This project sounds fun.
wall art
Very Interesting and also look very clearly
Did you in illustrator orany other vector software like coreldraw
I really liked the finished product! Thanks!
Awesome design! I came looking for an invitation idea for my 30th and found this. So inspired! Thanks :)