Top 7 GIMP Plugins

“Web design is the creation of digital environments that facilitate and encourage human activity; reflect or adapt to individual voices and content; and change gracefully over time while always retaining their identity.”
– Jeffrey Zeldman
GIMP is the king. You can’t go the wrong way here. He is the king of image editing in Linux platforms. Only Photoshop can enter the competition of popularity with it. GIMP has an incredibly community of developers, and a huge fan base of users. Its strength consists of plugins that are focused on web developers, photographers – they are the main users of GIMP.
Some plugins also fix some bugs, or get you some nice tricks up your sleeve. The really great thing is that all the plugins are developed by users that are using the software, so they know what to bring to the table. Enough chit-cat. Let’s see the top 7 GIMP plugins!
1. Anti-aliasing
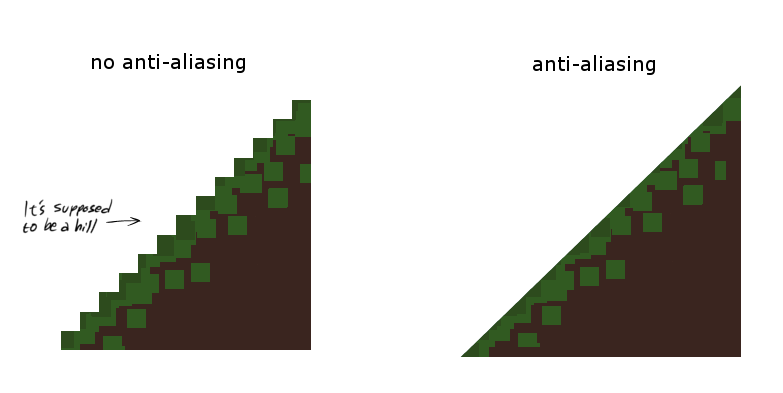
The anti-aliasing plugin does exactly this – “The solution to this problem (other than going out and buying a video system that doesn’t use square pixels) is to blur the colors along the stair-steps a little, to soften the jagged edges. This is what anti-aliasing does.”
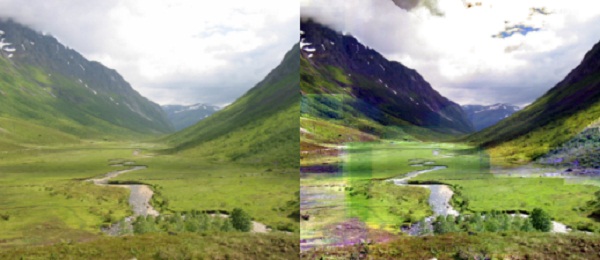
2. GIMP Adaptive Contrast Enhancement
The plugin can be downloaded right here. The package is available under the GNU public license, and is absolutely free. It is available in three versions. First one is a plugin to the GIMP program. The second one comes as a stand alone program with a friendly interface, and an extensive tutorial. The third one comes also as a stand alone program, as a command line.
“The basic form of most color contrast enhancement starts with the conversion of the image into gray scale, such as by taking the luminance values. Gray scale enhancement is applied to this image. Then the new and old gray scale values at each point are used in a transformation of the pixel color. The design decisions are how to convert to gray scale and then how to use the enhanced gray value to transform a color. There are widely differing choices”.
3. Refract and Reflect
It is the perfect tool to simulate water drops, and it can be used in so many incredibly cool ways. You can download it for free right here. The developer, that has been working on this plugin since 1998, has some really nice tips if you want to use it – “ Refract will accept an RGB image as a lens, will only use the first channel.
Go ahead and use gray scale.”, ”Try using the gradient tool, sinus, and solid-noise plugins to make lenses. Lenses work best when they are as precise as possible. That means using the full range of color available, from black to white. So run contrast auto stretch or Image, Histogram to see if you are using the full range of values. Flat spots on your lense can lead to undesired effects. A blur may ensure a smoother surface. If the resultant image ends up speckled despite all that, see if running Despeckle mode will help. A neat effect is following refract with a Bump Map.”
4. Pandora

Pandora is a great plugin for photographers that intend to make panorama photos – it stitches together multiple images to make a panorama, and it does it quite well. You can download it for free right here. The developer even wrote a 6 phase tutorial to help you. Load all the images as layers, delete the background layer, run Pandora, set the overlap and direction, tune each image’s position, and fine tune the layer masks. Of course, it is well explained right here.
5. Lomo

This Lomo plugin is a modified version of an old GIMP Lomo plugin, and it can be downloaded for free right here. This version works with the GIMP 2.4 release also. It is based on the original Lomo plugin by developer Francois Le Lay, but he hasn’t updated it since 2005. Donncha O Caoimh, the current developer has this little trick for you – “Just be warned, if you resize your image, make sure you right click on the Vignette layer and click “Layer to image size” before the resize. Otherwise odd things happen!”.
6. GIMP Publishr

GIMP Publishr publishes your images to Picasa, or Flickr directly from inside GIMP. It can be downloaded for free right here. Note, that you will need GIMP python installed, or it will crash. Here is a debug tip from the developer to help you out, if you encounter such problem – “If you don’t see the ‘Publish to web’ item in drop down menu – then Gimp didn’t load the publish plugin successfully. This may happen if you haven’t placed the plugin in right location, or Gimp incurred an exception while loading the plugin. This can be found by running Gimp from command line with verbose option – ‘gimp –verbose’. This will tell if and why loading of the plugin failed. “
7. FX Foundry
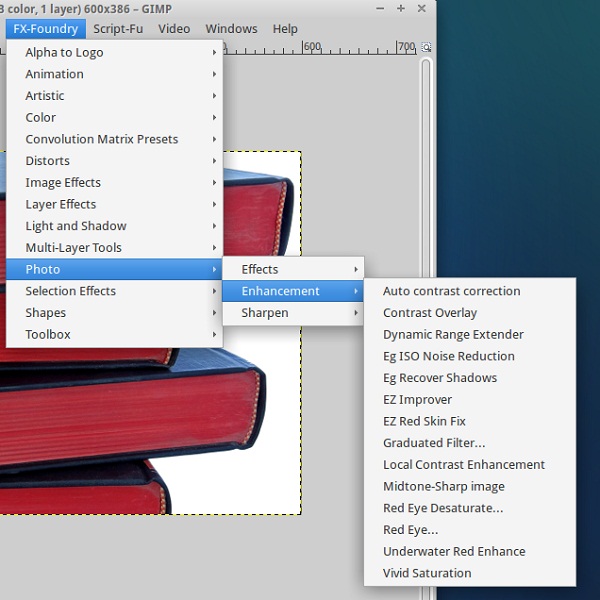
FX Foundry can be downloaded for free right here. Note that this pack contains over 100 scripts that are updated for the 2.6 GIMP version. The script engine is Script-Fu, and the code license is GPL. FX Foundry is considered to be one of the most popular and sought after script package out there – if I were you, I would immediately download this, you never know when it will be available as pay to download. If you are worrying that it won’t work on any newer versions, like 2.8, don’t fret. They are perfectly compatible with that version
This is our list of top 7 GIMP plugins. Hope you liked it. If you have a GIMP plugin that didn’t quite made our list, please feel free to post in the comments section below. If you have any tips and tricks that you would like to share with us, regarding GIMP plugins, you are most welcomed to share them. We would love to hear from you!
Hi,
first I wish you a Happy New Year!
IMHO you forgot G’MIC http://gmic.eu/.
Cheers
Thorsten
agree, where is G’MIC?