How to create a Death Angel Concept Design in Photoshop
Today we will create a death angel concept in Photoshop. Along with this, you will learn basic shading, lighting and making basic photo manipulations. We will create a monk in a black hooded robe, with dark wings, standing on a blazing pentagram.
This tutorial is thoroughly explained, ideal for beginner-level Photoshop users.
Difficulty: Beginner
Completion time: 30 minutes
Tools: Photoshop – I use CS3
Resources:
– monk from mjranum-stock
– Wings from Designious’ Wings Vector Pack 16
– dry ground by Grégory Millasseau
Final image preview

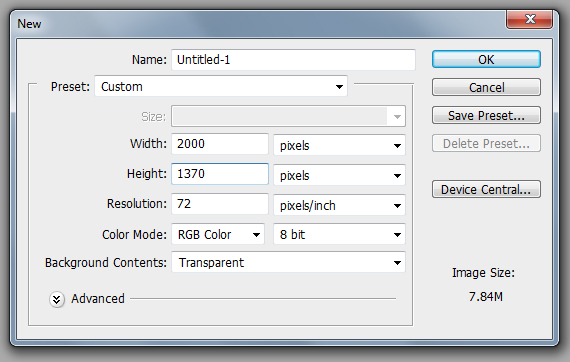
STEP 1
Create a document of 2000 x 1370 px in RGB color mode at 72 dpi. I prefer working in widescreen because I can crop the image later if I want to.

STEP 2
Open the “monk” image from mjranum-stock. Select all (CTRL+A), copy it (CTRL+C) and paste into our document.

STEP 3
Go to Edit > Free Transform (CTRL+T) and hold ALT+SHIFT keys and click-drag one of the corners to make it smaller. Hit Enter. The Shift key preserves proportions and the Alt key sets the reference point to center.

STEP 4
Grab the Pen Tool (P), set it on Paths and trace the contour of the monk. Then right-click > Make Selection. In the Layers palette (F7 or Window > Layers), click the “Add Vector Mask” button (it looks like a gray rectangle with a white circle inside).


STEP 5
Grab the Polygon Tool (U), set it on Shapes, type “5” in the Sides box, click the small “down arrow” to show the geometry options and check the “star” checkbox. Set this value to 50%.

STEP 6
Click-drag on the canvas while holding ALT and SHIFT keys and draw a large star.

STEP 7
Grab the Ellipse Tool (U) and draw a large circle. Make it a bit larger than the star. Also make it a different color. Then press CTRL+[ to send it behind the star.
I believe that as a beginner, you’ll have trouble selecting the tool, since there are multiple ones under the same shortcut. There are two ways you can select it: whether hold click on top of the tool to access its submenu or you can SHIFT+<key> to cycle through the submenu tools.

STEP 8
In the Layers palette (F7), select both layers (hold SHIFT and click the layer thumbnails) and go to Layer > Merge Layers (CTRL+E).

STEP 9
Go to Edit > Free Transform (CTRL+T) and hold CTRL while dragging the corners. Repeat this until you obtain a nice perspective. Hit Enter.

STEP 10
Hit CTRL+T to enter Free Transform mode, then resize it to fit the scenario. Hit Enter.
This will be our reference for the pentagram.

STEP 11
Open the “dry ground” picture and paste it into our drawing. Now grab the Polygonal Lasso Tool (L) and roughly trace some cracks. Then right-click > Layer Via Copy. Make this smaller and place it like below.

STEP 12
In the Layers palette (F7), hit the “Add Vector Mask” button (the rectangle with a white circle inside it). Now grab the Brush Tool (B), set Hardness to 0% and paint over the external areas of the crack.

STEP 13
Repeat STEP 12 until you create a complete pentagram.

STEP 14
Open the “wings” vector pack from designious.com, copy a wing and paste it into our document.

STEP 15
Enter Free Transform mode (CTRL+T), make it smaller and place it like below.

STEP 16
Create a new layer (CTRL+SHIFT+N) and press CTRL+SHIFT+[ to send it to back. Then grab the Paint Bucket Tool (G) and fill it with black.

STEP 17
Go to the Layers palette (F7) and SHIFT+click select all the layers with the cracks. Then hit CTRL+G to place them in a layer group. Double click its name to make it editable and type “cracks”. Hit Enter.

STEP 18
Go to Layer > New > Layer (CTRL+SHIFT+N). Grab the Brush Tool (B), set Hardness to 0%, hit “4” to set its Opacity to 40%, set Foreground color to a bright orange and paint roughly over the cracks.
Hit “ [ “ to make the brush smaller, change the color to a bright red and paint over the cracks’ walls. Adjust the brush size using “ [ “ and “ ] “. When you want to pan the image (hold Space), notice that it won’t let you go beyond the edges of the canvas. Here’s a neat trick: hit F once. This will change your view mode and allow you to pan wherever you want. Press this multiple times of you want to return to the original one.

STEP 19
Select the layer with the monk. If you don’t remember which one it is, grab the Selection Tool (V) and check its Auto Select Layer feature. Then click on the monk. Go to Layer > Duplicate Layer (CTRL+J).

STEP 20
Go to Image > Adjustments > Desaturate (CTRL+SHIFT+U). Then go to Image > Adjustments > Levels and use the settings below or similar.

STEP 21
Create a new layer (CTRL+SHIFT+N), grab the Brush Tool (B), hit “9”, set foreground to a light yellow and Hardness to 100%, set it to 1 px and paint over the edges of the monk. This wil be our intense glow on the clothes. Keep in mind that the light comes from below him and not from the top.

STEP 22
Increase the brush size, hit “2” and paint over the clothes with a light orange. Feel free to make different mixes of orange, red and yellow, we want to create alot of brightness. Play around with fiery colors, go wild!
Do not undo if you go a bit astray, we will fix any imperfections later. If you really want to undo, the shortcut keys are CTRL+ALT+Z. I’m mentioning this because I also had trouble undoing multiple steps when I started using Photoshop.

STEP 23
Create a new layer (CTRL+SHIFT+N), grab the Brush Tool (B), press 7, set Hardness to 0%, set foreground color to a bright orange and place some dots on random areas of the monk.

STEP 24
Create a new layer. Grab the Paint Bucket Tool (G) and fill it with a bright orange. Then set the background color to a light yellow. Go to Filter > Render > Fibers. Use the settings below or similar.

STEP 25
Go to Filter > Blur > Motion Blur, set Angle to 90 degrees and Distance to 400 px. Hit OK.

STEP 26
In the Layers palette (F7), set Blending mode to Overlay. Then create a new layer (CTRL+SHIFT+N or Layer > New > Layer) and place it below the current one.

STEP 27
Grab the Brush Tool (B), set Hardness to 0%, hit 4 and paint some vertical lines. Adjust Opacity, size and color freely.


STEP 28
Select the layer above it, CTRL+click the layer mask of the layer with the monk to load a selection, go to Select > Inverse (CTRL+I), then click the “Add Vector Mask” button in the Layers palette. This will remove the nasty vertical lines from the monk’s clothes.

STEP 29
Select the layer with the wing. Go to Image > Adjustments > Hue/Saturation. Check the “Colorize” checkbox and use the settings below or similar.

STEP 30
Create a new layer (CTRL+SHIFT+N), grab the Brush Tool (B), set foreground color to a bright yellow, set Hardness to 0% and Opacity to 70% and paint the areas shown below. Then reduce the brush size, make it smaller and hit 9. Paint again in the same areas, but as close to the feathers’ edges as possible.


STEP 31
Create a new layer and set its Blending mode to Multiply. Grab the Brush Tool (B), hit D and paint some shadows, as shown below.

STEP 32
Select the wing layer and the two layers above it, hit CTRL+G to place them in a layer group and rename this group “wing”.

STEP 33
Click-drag this layer group onto the “Create a New Layer” button to duplicate it. Go to Edit > Free Transform, them right-click > Flip Horizontal.

STEP 34
Then place this layer group as the other wing.

STEP 35
Select the layer with the Fibers render (use the auto-select feature of the Selection Tool (V)) and create a new layer (CTRL+SHIFT+N). Grab the Brush Tool (B), hit F5 to open the Advanced Options and use the settings below.

STEP 36
Paint random areas vertically, as shown below. Also adjust the brush size at random.

STEP 37
Select the background layer, go to Layer > New > Layer (CTRL+SHIFT+N). Then set foreground to black and background to a dark red. Go to Render > Clouds. Hit CTRL+T and make it smaller. Hit Enter.

STEP 38
Click the “Add Vector Mask” button in the Layers palette, grab the Brush Tool (B), set hardness to 0% and mask the area shown below.
Done!


You can download the source file from the link below.
[download id=”165″]
cool tutorial..thanks man…
looks cool… will have a go.
Mind Blaster visualization
…..
Very good tutorial,
On my first attmept at this deisgn i got similiar to the results shown in this tutorial.
Thanks a lot :)
But when I click on the package of wings I go on the site, but it tells me I have to pay them. Is this normal?
Yes. The vector pack is premium.
Hello,
Thanks immensely for taking the time to put together this tutorial. I only recently started using Photoshop, but I hope this tutorial will give me the information and confidence to design some nice themes.
Cheers,
Pope
Great piece of work but i’m a newbi and would like access to the tutorial, but what do i need to access this art’s tut?
sir i want to make simlar pic like this plz tell me how to add shadows and edge glowing effects on clothes .. i tried but i didnt get the same result :( y ?
MERCI POUR CE TRES BON TUTO PARFAITEMENT REALISE .JE SUIS SUR DA ET JE VOUS AI CITE .MERCI
De rien :) Merci pour ton interet au nos tutos :)
Nice tips in this tutorial!
so good! thanks
I've tried this before and it took me about 3-4 hours but still look fine…thanks for this good tutorial easy to follow instructions…
I cant joint the star & circle in to the same layer.. how to make it?
Select both layers and hit CTRL+E
Bonjour,
Votre création est superbe !
Je souhaite savoir si je peux utiliser votre Ange Noir avec pentagramme. Je dois réaliser une couverture de livre et ce serait idéal. Si vous acceptez et si ma cover est retenue, je vous ferais parvenir un exemplaire ;)
Merci.